CodeHero PRO — User Guide
Complete guide to using the CodeHero platform for AI-powered software development.
1. Login & Dashboard
Login
Open your browser and navigate to https://YOUR_IP:9453. You'll see the login page.

Default credentials:
- Username:
admin - Password:
admin123
sudo /opt/codehero/scripts/change-passwords.shTwo-Factor Authentication (2FA): If enabled in settings, you'll be prompted for a 6-digit code from Google Authenticator. Use "Remember this device" to skip 2FA on trusted devices until end of month.
Account Lockout: After 5 failed login attempts, the account is locked for 15 minutes.
Dashboard
The Dashboard is your main control center showing real-time system status.
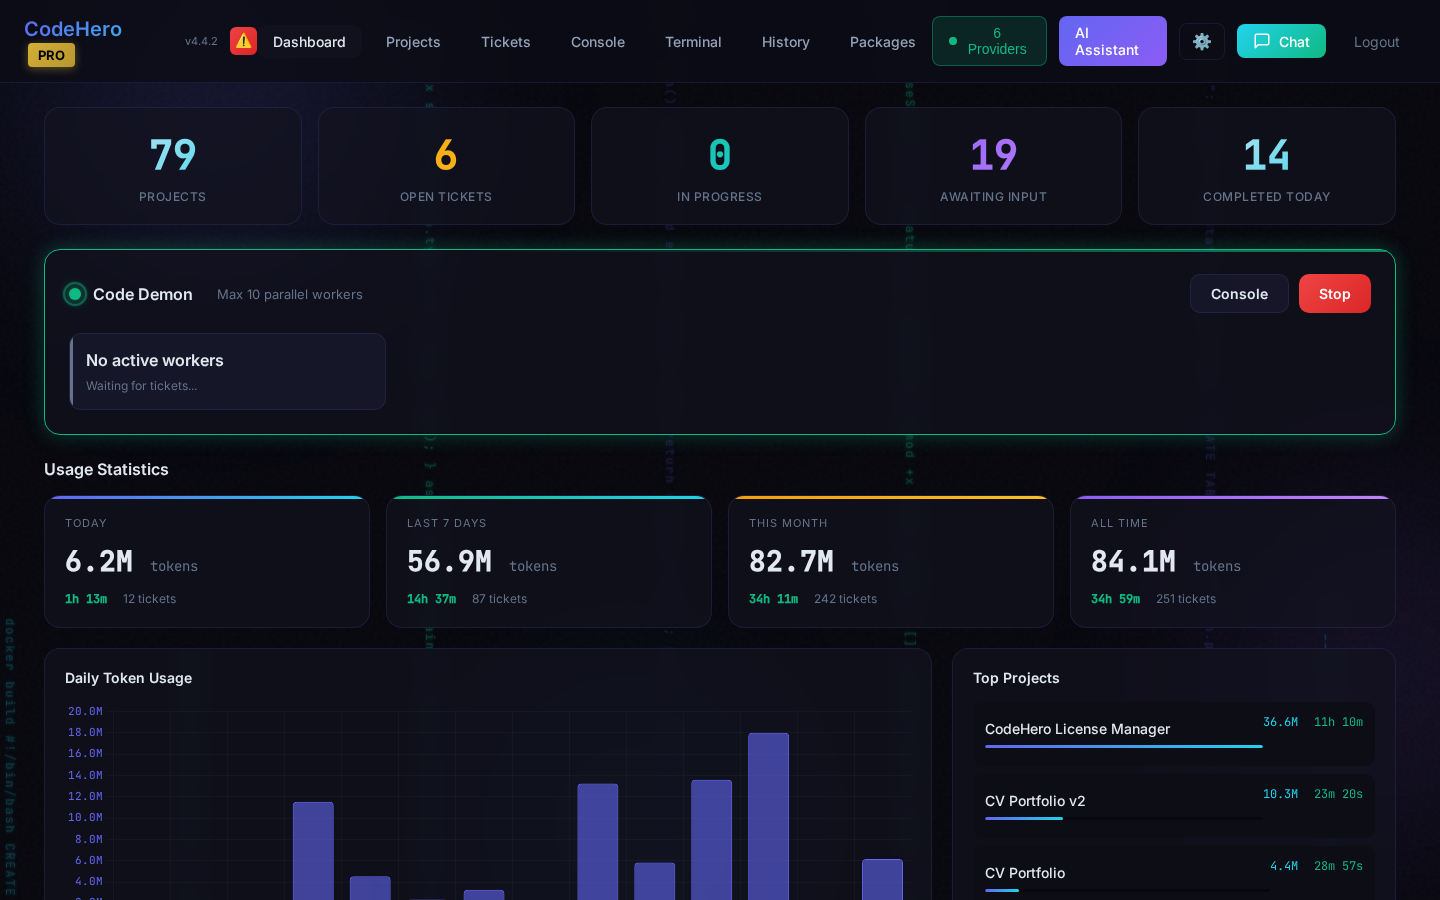
Dashboard elements:
- System Status — Whether the daemon service is running
- Quick Stats — Active projects, open tickets, sessions today, total tokens
- Recent Activity — Latest ticket updates and completions
- Token Usage — Daily/weekly/monthly token consumption charts
- Update Badge — Green badge appears when a new version is available
2. Creating Projects
Projects Page
The Projects page shows all your development projects in a card grid layout.
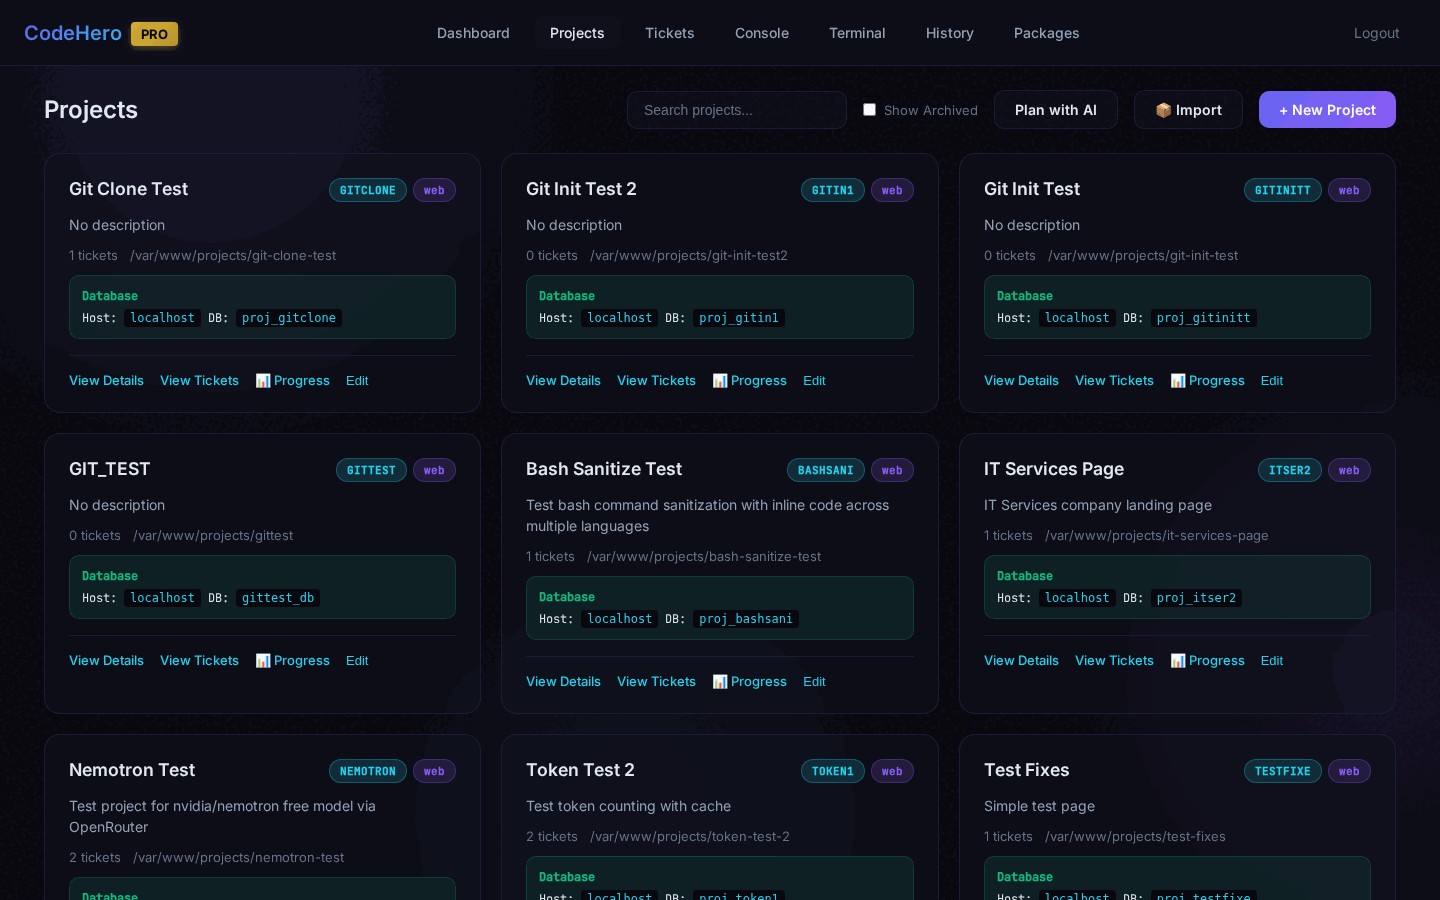
Each project card displays: project name, type, description, working directory path, open ticket count, provider/model, and quick action buttons.
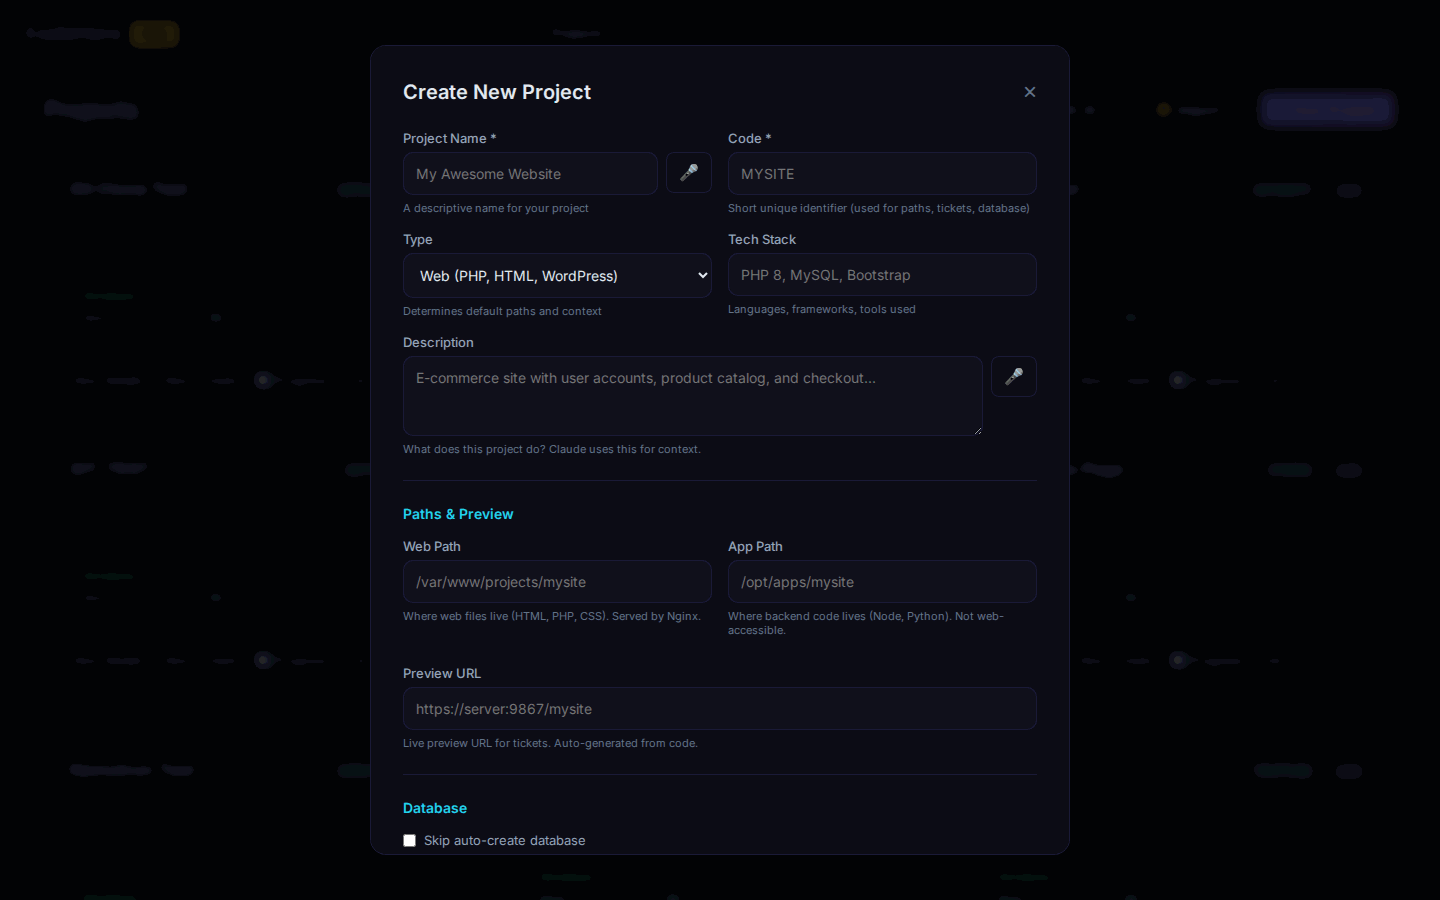
Create New Project
Click "+ New Project" to open the creation modal.

| Field | Required | Description |
|---|---|---|
| Name | Yes | Descriptive project name |
| Project Type | Yes | web, app, api, cli, library |
| Tech Stack | Yes | php, node, react, python, java, etc. |
| Description | Yes | Brief description of the project |
| Web/App Path | No | Working directory (auto-generated) |
| Provider | No | AI provider (anthropic, gemini, openai, etc.) |
| AI Model | No | Developer role (master/senior/junior) |
| Think Mode | No | Extended thinking level |
| Execution Mode | No | Default for new tickets |
| Project Type | Default Path |
|---|---|
web (PHP, HTML) | /var/www/projects/{name} |
app, api, cli, library | /opt/apps/{name} |
3. Importing Projects
Import existing projects from ZIP, Git, or local path.
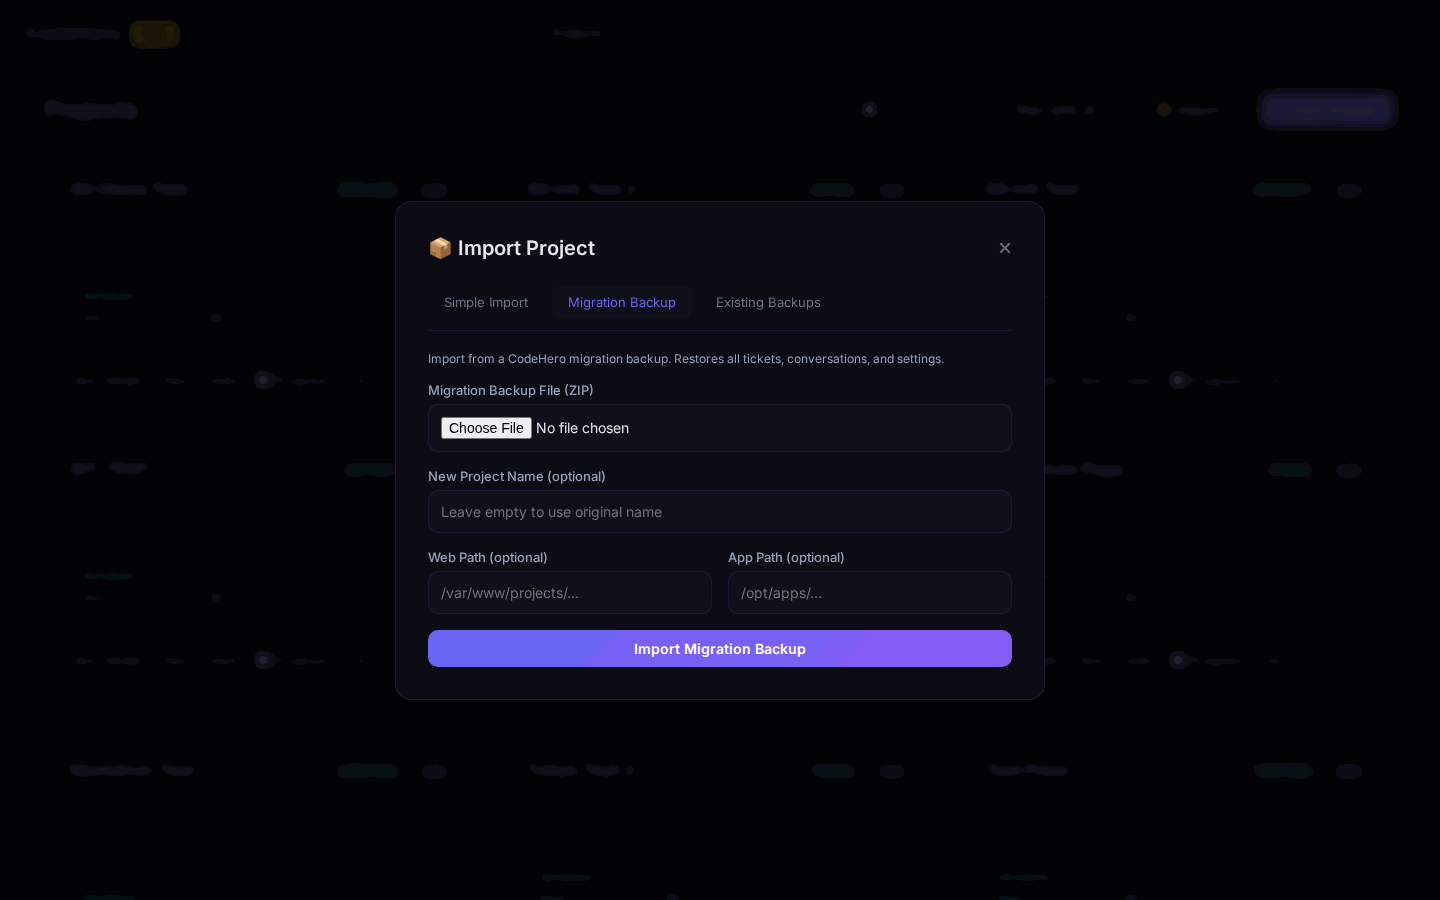
| Mode | Description | Use When |
|---|---|---|
| extend | Copy files into project path | Continue developing the project |
| reference | Store separately as template | Build something similar |
| Source | Examples |
|---|---|
| ZIP | URL or local path to ZIP file |
| Git | Repository URL (public or private) |
| Path | Local folder path (fastest for large projects) |
Git Private Repositories
| Platform | Username | Token Type |
|---|---|---|
| GitHub | Optional | Personal Access Token (PAT) |
| GitLab | Not needed | Personal Access Token |
| Bitbucket | Required | App Password |
4. Project Detail Page
Click on any project to view its detail page. The page is organized in collapsible sections.
Overview
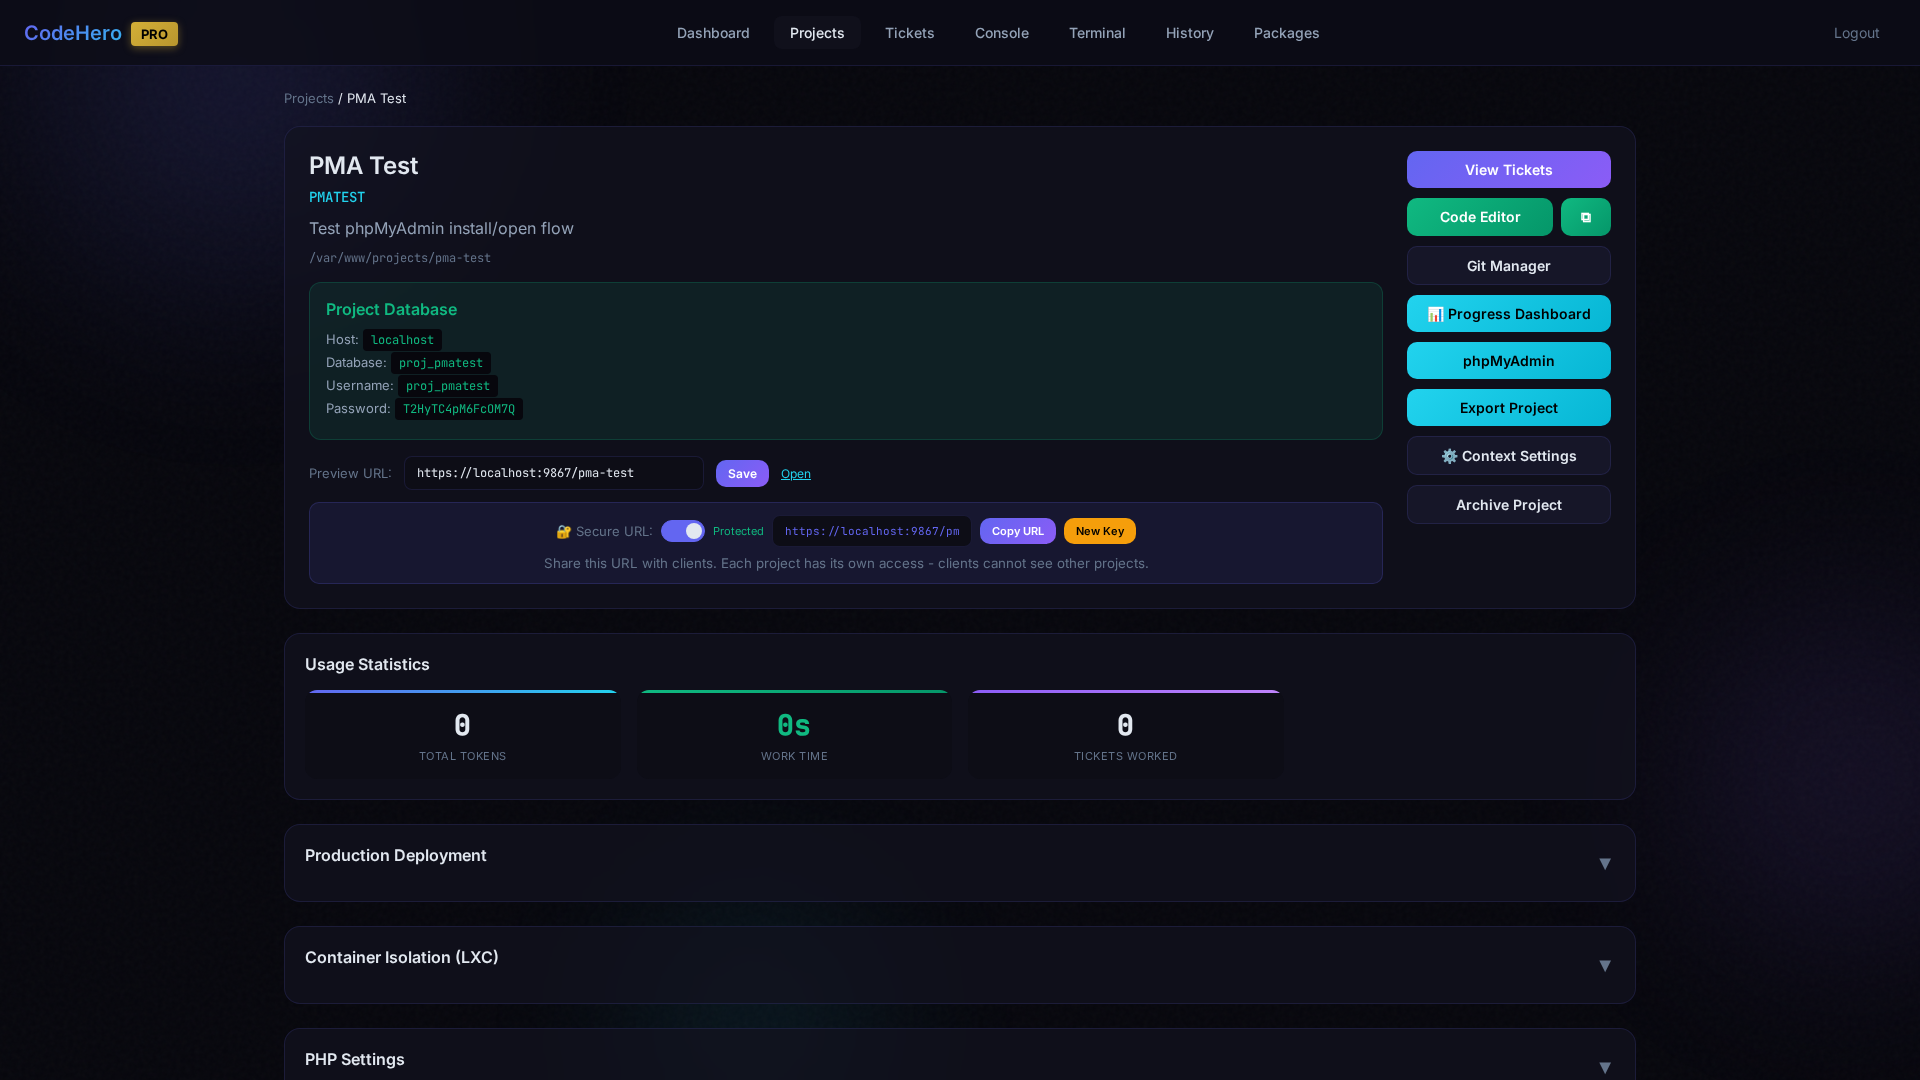
The top section shows project info (name, type, tech stack, description), database connection details with copy buttons, preview URL, quick action buttons (Code Editor, Git Manager, Progress Dashboard, phpMyAdmin, Export, Context Settings, Archive), and usage statistics (tokens, time, completed tickets).
Production Deployment
Deploy the project to a production-ready nginx config with its own domain or subdomain. Includes SSL certificate management.
Container Isolation (LXC)
Run the project in its own isolated LXC container with dedicated services. See Section 31 for full details.
PHP Settings
Configure the host-level PHP version and .user.ini for projects running directly on the host via nginx:
- PHP Version — Select and install any PHP version (7.4–8.4). Installs automatically and updates nginx config.
- .user.ini Editor — Edit PHP settings (
upload_max_filesize,memory_limit, etc.) with inline or fullscreen editor.
Context Settings
Customize the AI context for this project: select tech stack to load defaults, edit global context (universal rules) and project context (language-specific patterns).
Project Files
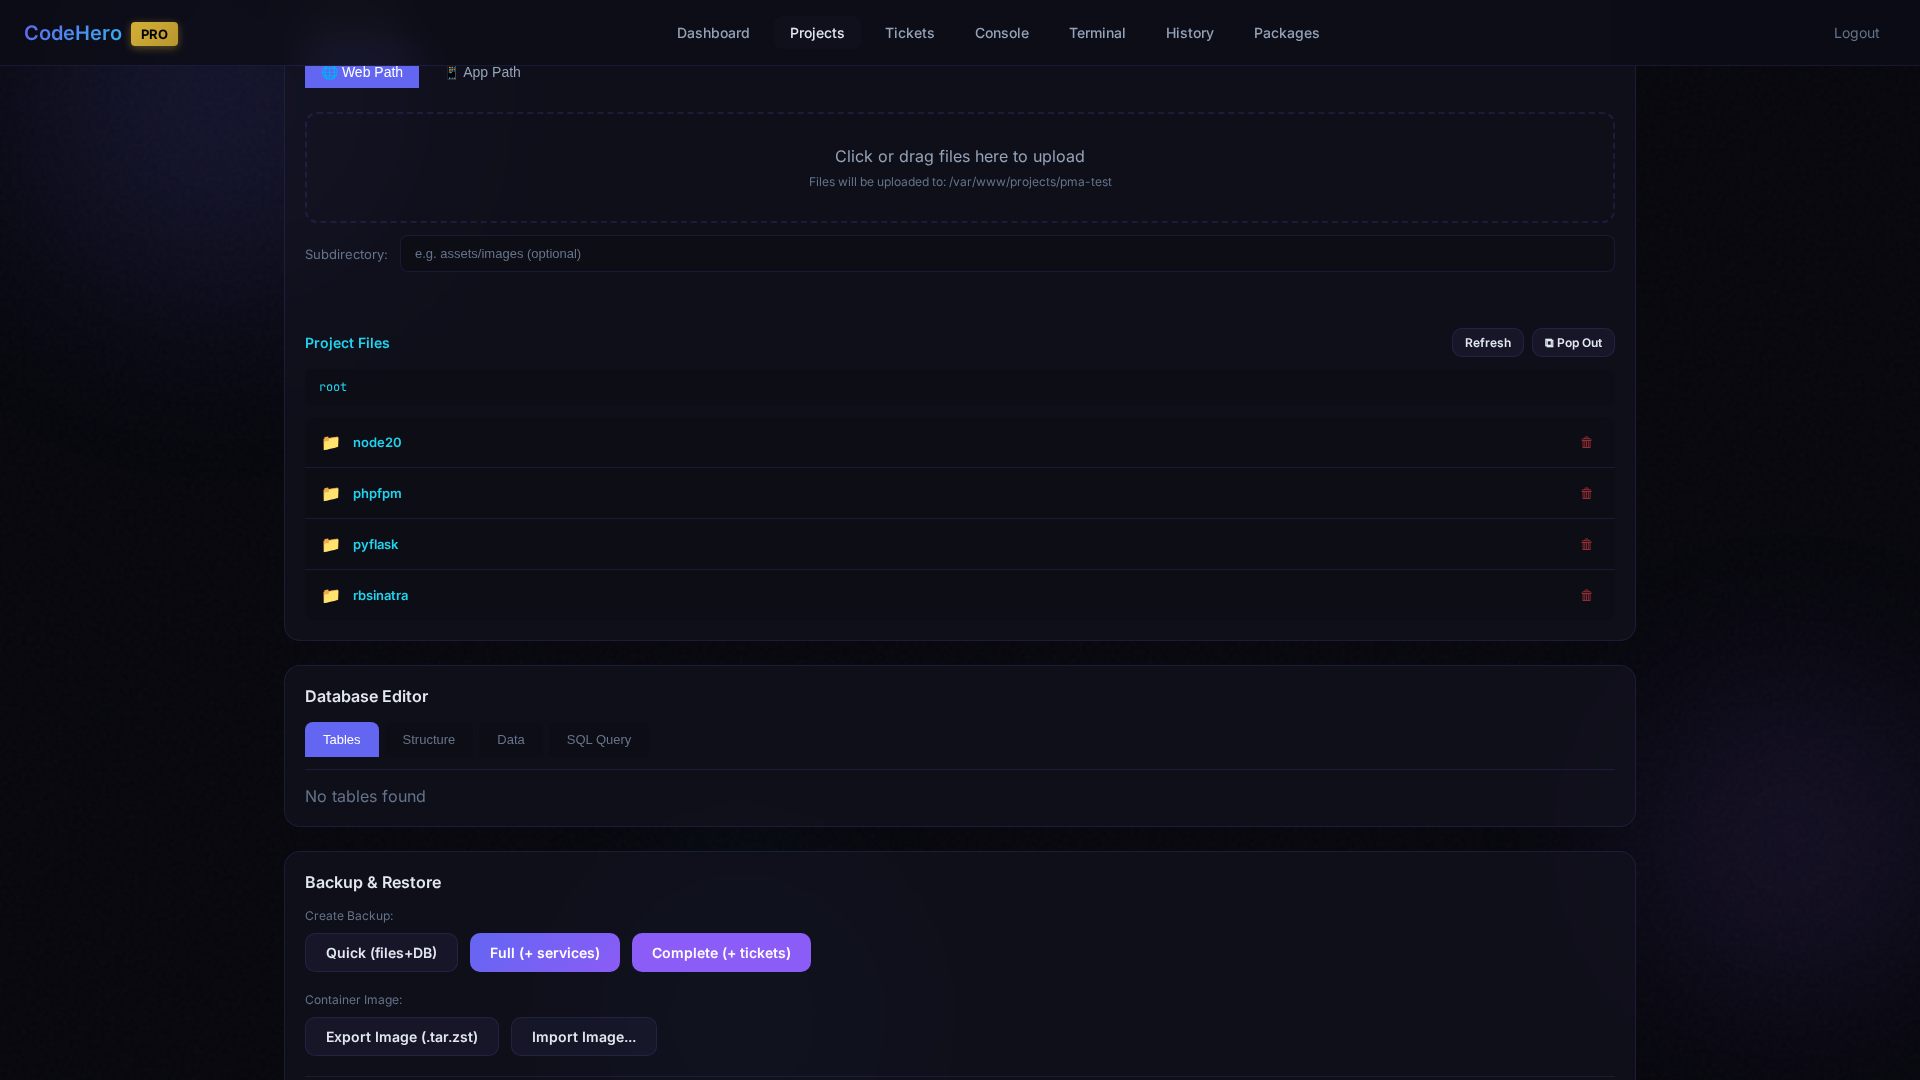
Upload files via drag & drop, browse the directory tree with folder navigation, delete files, and use the subdirectory filter. Includes Refresh and Pop Out (open in new window) buttons.
Database Editor
Each project gets its own MySQL database. Four tabs: Tables (clickable cards with row counts), Structure (column definitions), Data (browse with pagination), SQL Query (run queries directly).
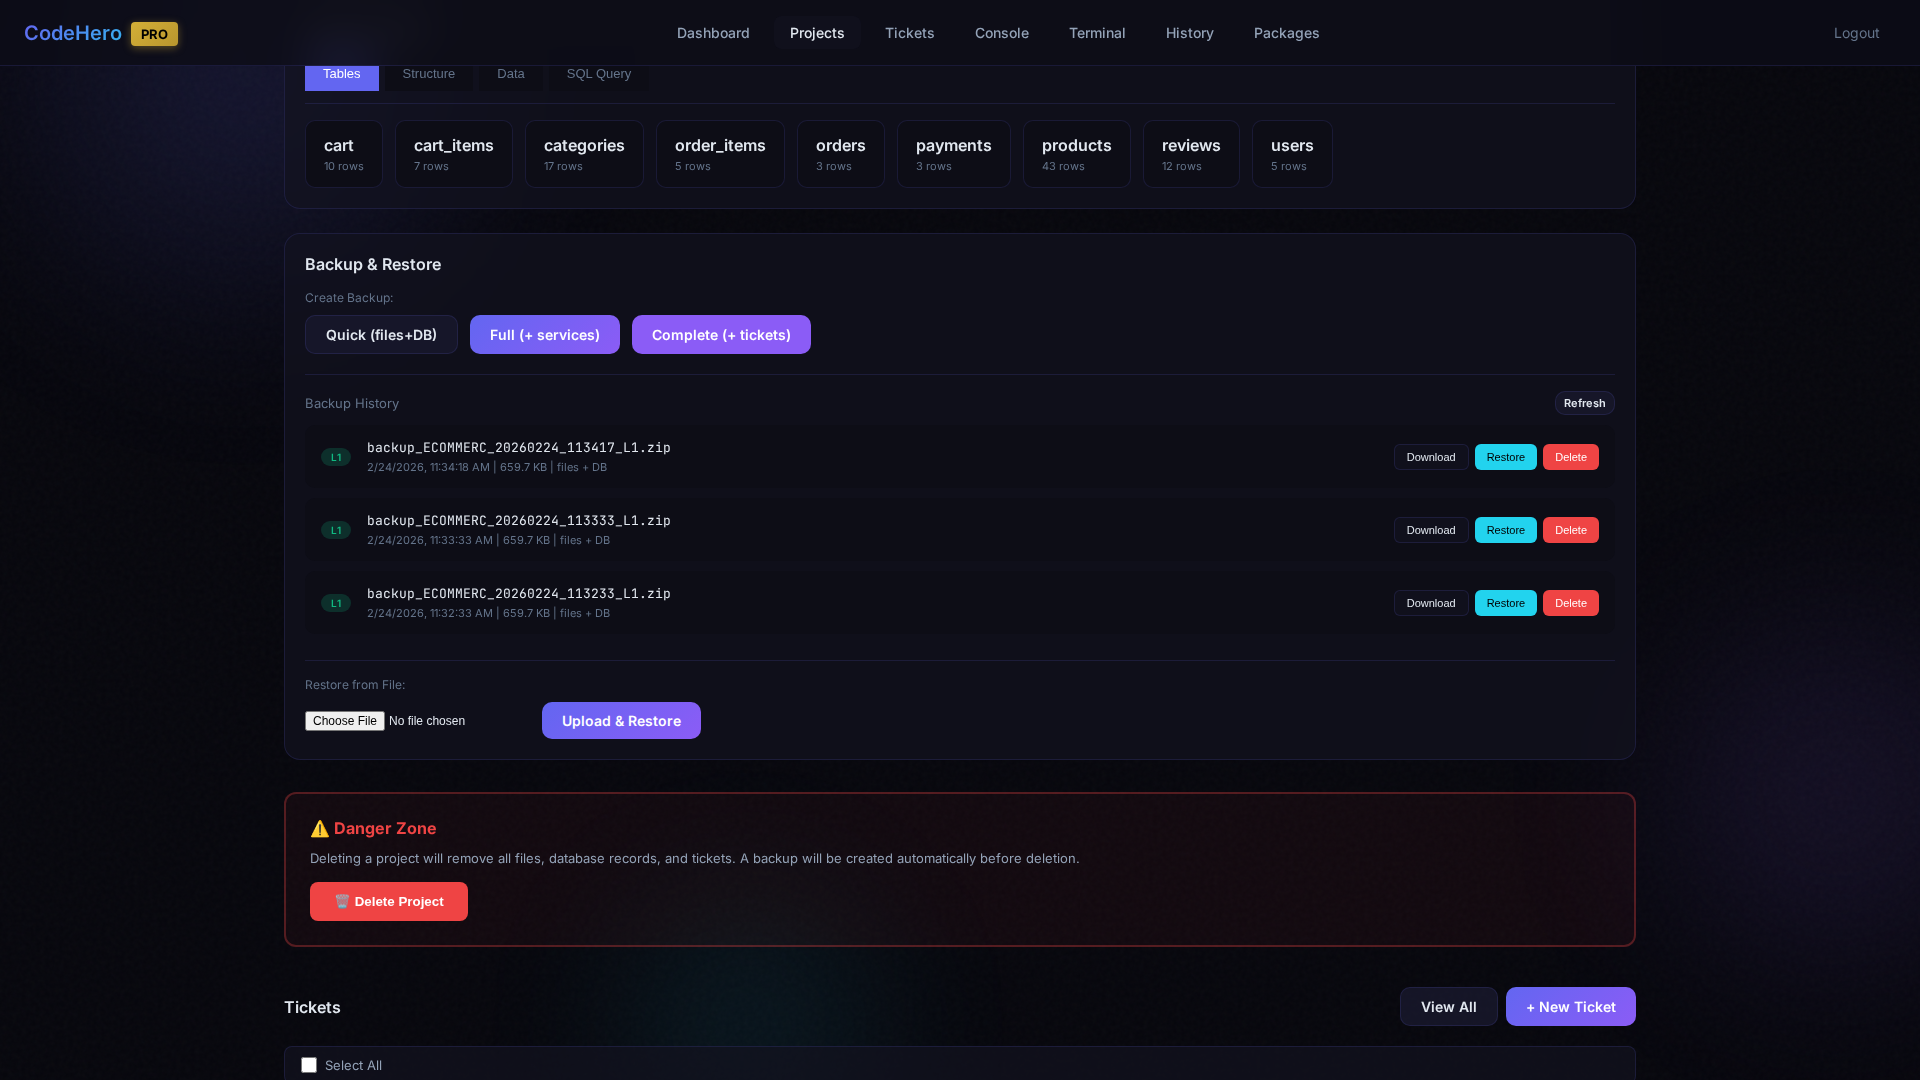
Backup & Restore
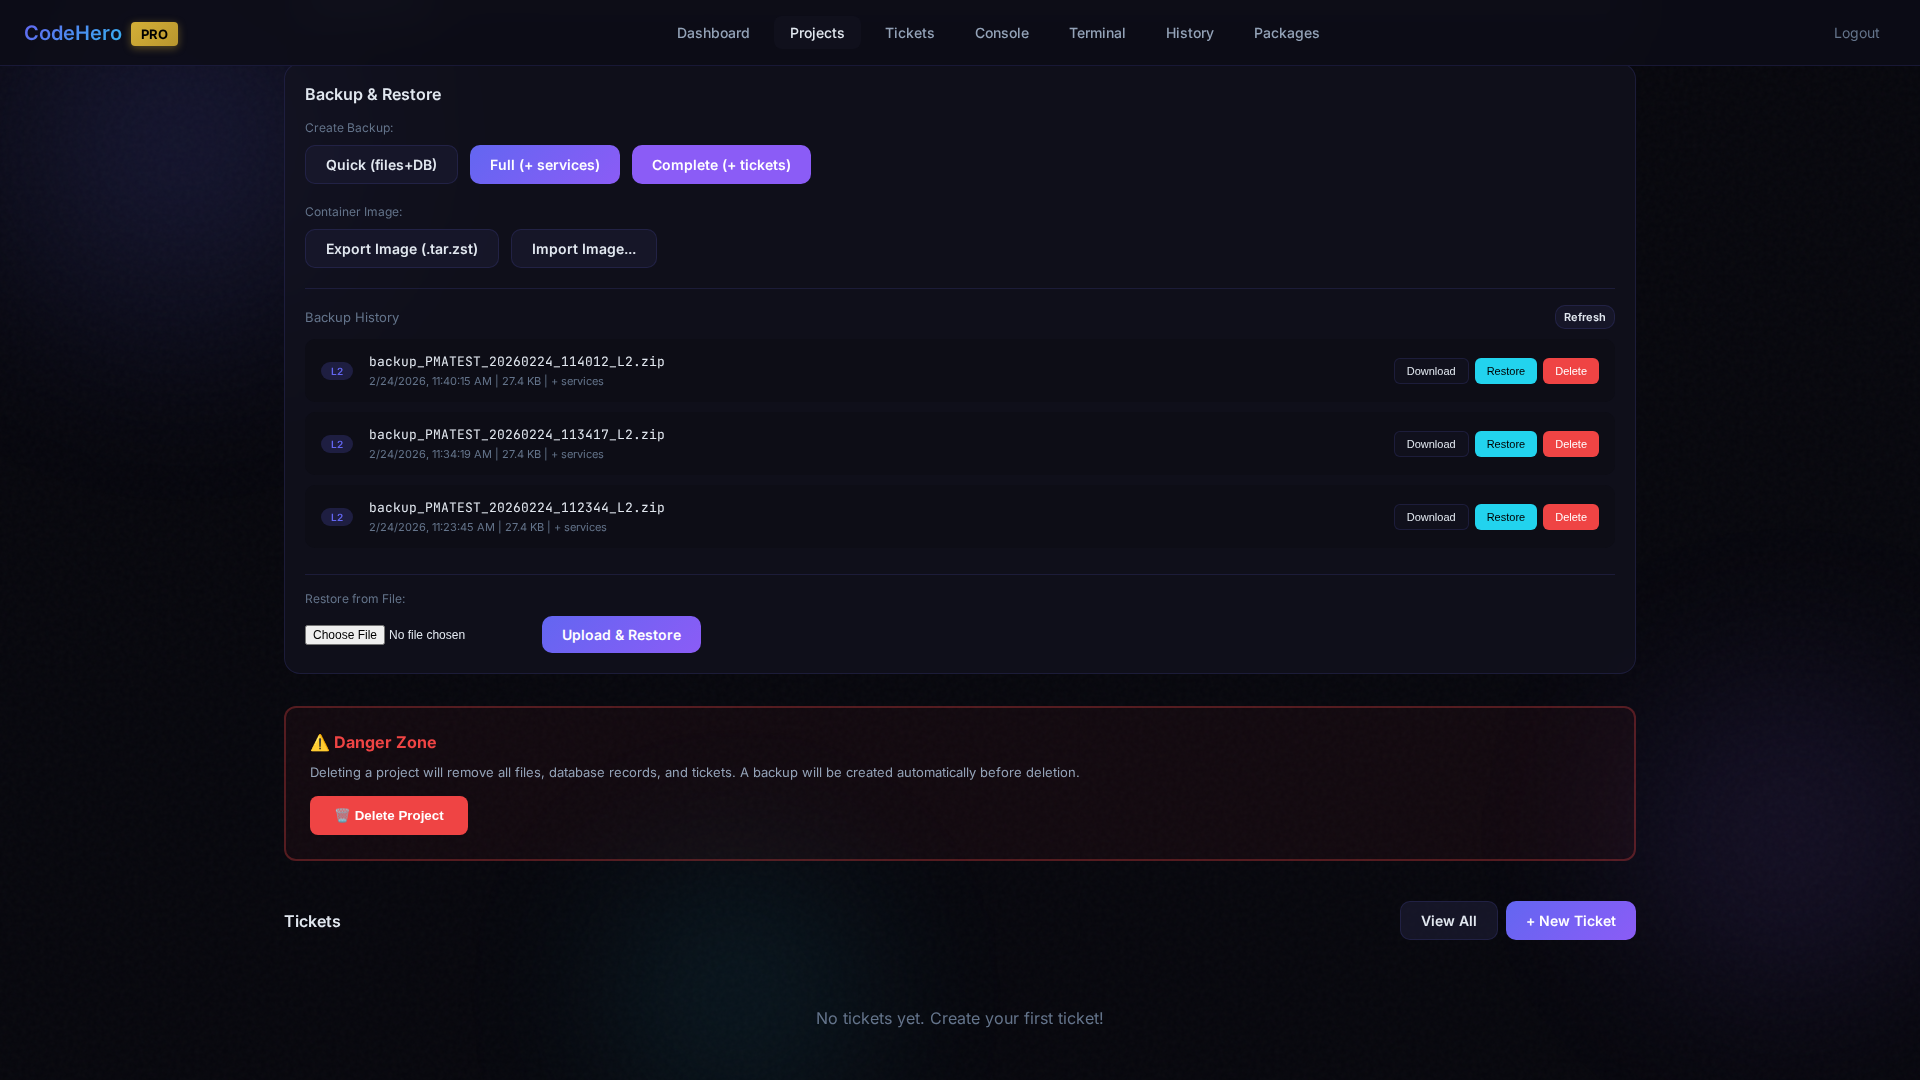
| Level | Contents | Use case |
|---|---|---|
| Quick (files+DB) | Project files and database dump | Fast daily backups |
| Full (+ services) | Files, DB, container services and databases | Full project state |
| Complete (+ tickets) | Everything plus tickets and conversations | Migration between servers |
Additional features: container image export/import, backup history with download/restore/delete, and upload & restore from another server.
Danger Zone
Delete the project and all its data. A backup is created automatically before deletion.
5. Project Settings & Context
Project Context
Each project has an AI context that helps the AI understand the codebase:
- Auto-generated — Created during project analysis
- Manual — Add custom instructions, coding standards, architecture notes
- Framework detection — Auto-detects tech stack and relevant files
Project Settings
Edit project settings from the project detail page: change provider, AI model, think mode, update description and context, set default execution mode, configure auto-commit and auto-push for git.
6. Creating Tickets
Tickets are the core workflow unit. Each ticket represents a task for the AI to complete.
| Field | Required | Description |
|---|---|---|
| Title | Yes | Short description of the task |
| Description | Yes | Detailed instructions for the AI |
| Type | No | Category (feature, bug, task, etc.) |
| Priority | No | low, medium, high, critical |
| Provider | No | Override project's provider |
| AI Model | No | Override project's developer role |
| Think Mode | No | Override project's think mode |
| Execution Mode | No | Override project's execution mode |
| Sequence Order | No | Execution order number |
| Dependencies | No | Tickets that must complete first |
| Parent Ticket | No | Create as sub-ticket |
| Max Retries | No | Auto-retry count (default: 3) |
Tickets Page

Features: drag-and-drop reordering, filter by status/type/priority, bulk actions, and sequence visualization.
7. Ticket Types & Priority
Ticket Types
| Type | Color | Use For |
|---|---|---|
| feature | Purple | New functionality |
| bug | Red | Fix broken behavior |
| debug | Orange | Investigation, troubleshooting |
| rnd | Violet | Research & Development |
| task | Gray | General work (default) |
| improvement | Cyan | Refactoring, optimization |
| docs | Green | Documentation |
Priority
| Priority | When to Use |
|---|---|
| critical | Urgent, blocks other work |
| high | Important, do soon |
| medium | Normal priority (default) |
| low | Nice to have |
8. Execution Modes
Control how much freedom the AI has when working on tickets.
| Mode | Description |
|---|---|
| Autonomous | Full access, no permission prompts. AI works uninterrupted. Default |
| Semi-Autonomous | Smart sandbox. Auto-approves safe operations, asks for risky ones, blocks dangerous. |
| Supervised | AI asks permission before every write/edit/bash operation. |
Semi-Autonomous Mode Details
Auto-Approved (no prompts)
- File create/edit/delete within project folder
- Running tests (
npm test,pytest,phpunit) - Build commands (
npm run build,composer install) - Git read operations (
git status,git log,git diff)
Requires Approval
- Installing packages (
npm install,pip install) - Git write operations (
git commit,git push) - Database migrations
- Network requests (
curl,wget)
Blocked
- System commands (
sudo,apt,systemctl) - Modifying
.gitfolder - Accessing system paths (
/etc,/opt/codehero) - Dangerous commands (
rm -rf /,chmod 777)
9. Sequencing & Dependencies
Sequence Numbers
Control execution order: assign a number (1, 2, 3...) to each ticket. Lower numbers run first. Same number = run in parallel (up to 5 tickets per project).
sequence_order=1: [Setup DB, Install deps]     → Run in PARALLEL
sequence_order=2: [Build auth]                  → Waits for seq=1
sequence_order=3: [Users API, Products API]     → Run in PARALLEL
Relaxed vs Strict Mode
| Mode | Behavior |
|---|---|
| Relaxed | Dependent tickets can start when parent reaches awaiting_input or done |
| Strict | Dependent tickets wait only for done status |
10. Sub-tickets & Parent Tickets
Break complex tasks into smaller pieces:
- Create a main (parent) ticket
- Create sub-tickets with Parent Ticket set to the main ticket
- Sub-tickets inherit project context + receive parent's conversation summary
Sub-tickets wait for parent to complete first, then receive context from parent's title, description, and last 50 messages.
11. Ticket Lifecycle & Actions
Ticket Statuses
| Status | Description |
|---|---|
open | Waiting to be processed |
in_progress | AI is currently working |
awaiting_input | AI needs your response |
done | Successfully completed |
failed | Something went wrong |
skipped | Manually skipped |
timeout | Exceeded max duration |
Ticket Detail
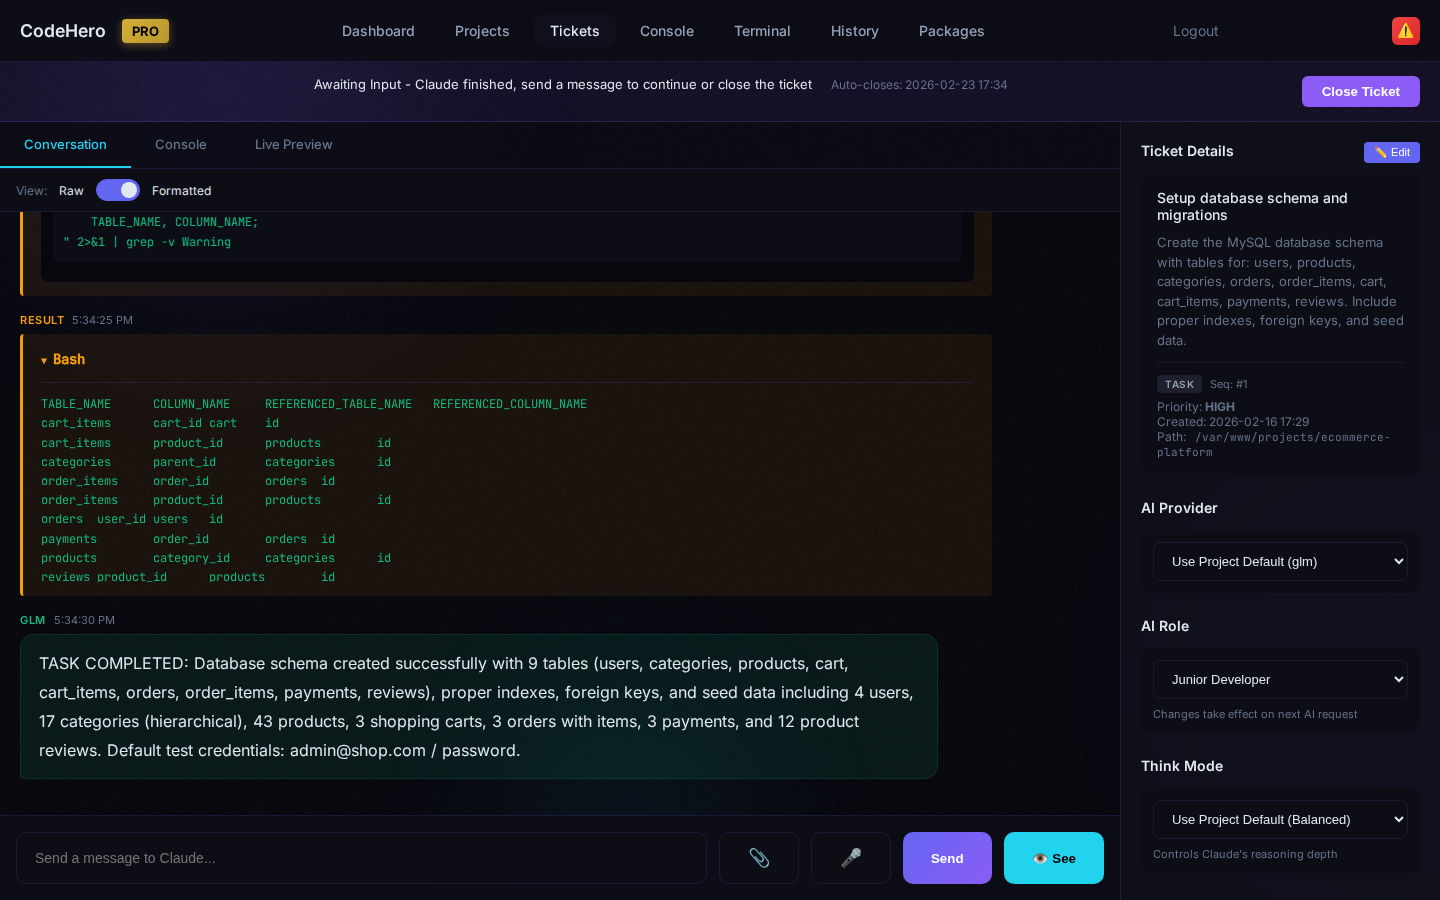
Ticket Conversation
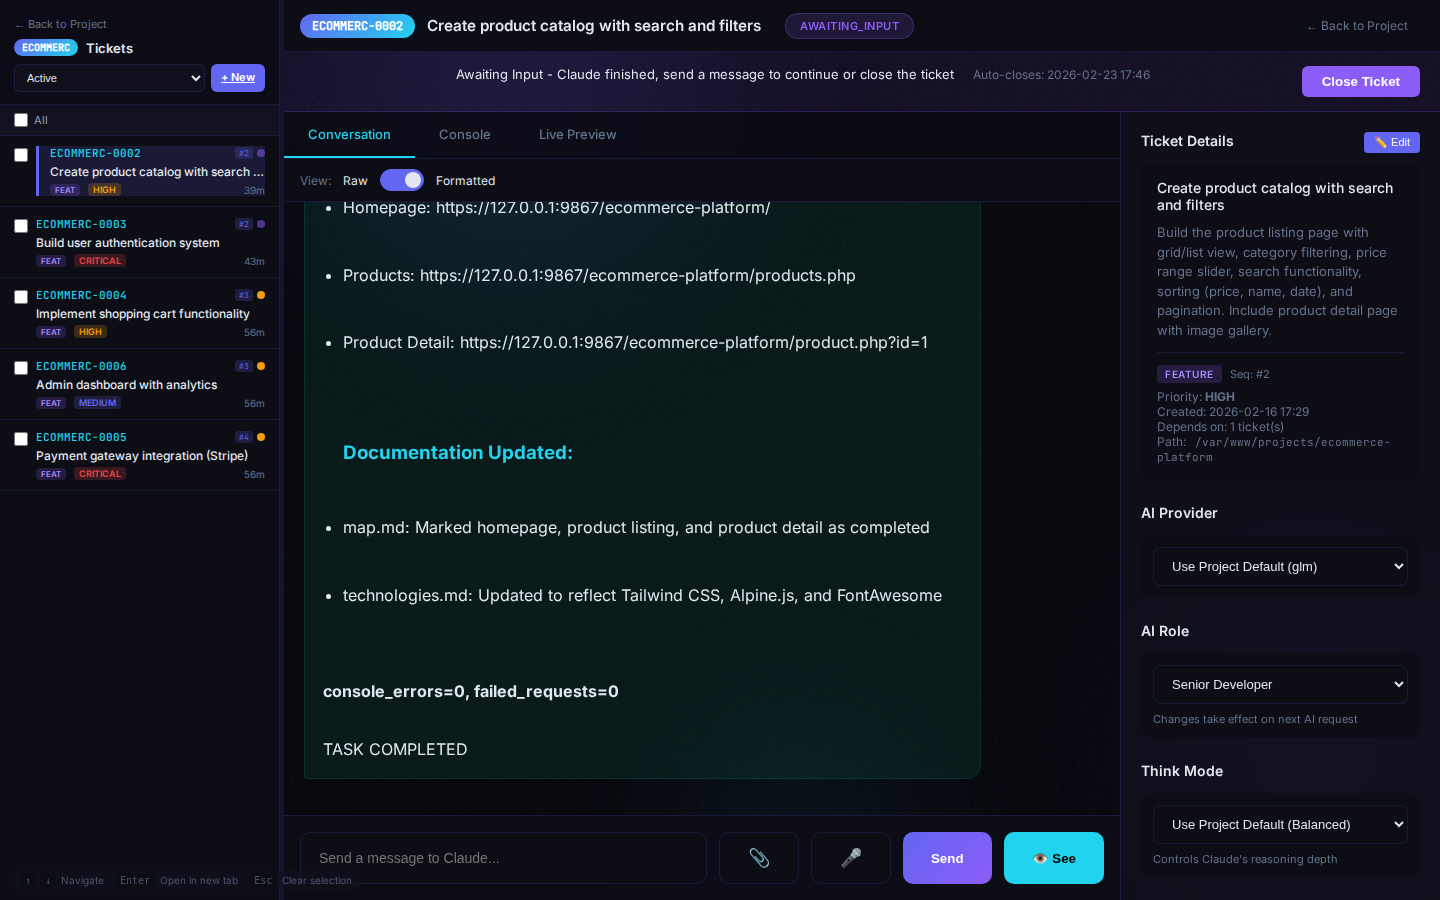
Actions
| Button | What it does |
|---|---|
| Start Now | Jump to front of queue |
| Retry | Retry a failed ticket |
| Skip | Skip this ticket |
| Delete | Permanently delete ticket |
| Stop | Kill switch — stop AI immediately |
| Send Message | Add instructions (reopens if awaiting) |
12. Auto-Retry
Failed tickets can automatically retry. Each ticket has retry_count (starts at 0) and max_retries (default 3). When a ticket fails, retry_count increments. If retry_count < max_retries, the ticket resets to open and tries again.
13. Multi-Provider Support
CodeHero currently routes through 7 cloud providers and a curated 14-model catalog. Switch per task — never locked in. Local providers (Ollama, vLLM) are on the roadmap but not yet enabled.
| Provider | Available Models | Native price (in/out per 1M) | Subscription option |
|---|---|---|---|
| Anthropic | Claude Opus 4.8, Sonnet 4.6, Haiku 4.5 | $5/$25 → $1/$5 | ✅ Claude Pro/Max |
| OpenAI | GPT-5.5, GPT-5.4, GPT-5.4-mini | $5/$30 → $0.75/$4.50 | ✅ ChatGPT Plus/Pro (via Codex CLI) |
| Google Gemini | Gemini 2.5 Pro | $1.25 / $10 | — |
| xAI Grok | Grok 4.3 (1M ctx, always-on reasoning) | $1.25 / $2.50 | — |
| DeepSeek | V4 Pro (text only, no vision) | $0.27 / $1.10 | — |
| z.ai GLM | GLM 5.1 (vision) | $0.30 / $1.10 | ✅ GLM Coding plan |
| OpenRouter | 14-model catalog (everything above + 4 OR-exclusive) | Native price + 5.5% | — |
14-Model Catalog with Pricing & Strengths
Pricing is per 1M tokens. Subscription column shows the route when using a flat-rate plan (≈5× cheaper than the equivalent native API). Smart weight is 1–10 (10 = arena frontier).
| # | Model | Native in / out | OR +5.5% | Sub | Smart | Best for |
|---|---|---|---|---|---|---|
| 1 | anthropic/claude-opus-4-8 | $5 / $25 | $5.28 / $26.38 | ✅ | 10 | reasoning, debug, mobile, web design, refactor |
| 2 | anthropic/claude-sonnet-4-6 | $3 / $15 | $3.17 / $15.83 | ✅ | 9 | web design, PHP backend, frontend frameworks, code review, databases |
| 3 | anthropic/claude-haiku-4-5 | $1 / $5 | $1.06 / $5.28 | ✅ | 7 | boilerplate, docs, PHP frontend, testing |
| 4 | openai/gpt-5.5 | $5 / $30 | $5.28 / $31.65 | ✅ | 10 | reasoning, debug, mobile, web design, code review |
| 5 | openai/gpt-5.4 | $2.50 / $15 | $2.64 / $15.83 | ✅ | 9 | databases, PHP backend, backend API, frontend frameworks |
| 6 | openai/gpt-5.4-mini | $0.75 / $4.50 | $0.79 / $4.75 | ✅ | 7 | boilerplate, docs, PHP frontend, testing, backend API |
| 7 | x-ai/grok-4.3 | $1.25 / $2.50 | $1.32 / $2.64 | — | 8 | reasoning, debug, backend API, code review (always-on reasoning, 1M ctx) |
| 8 | deepseek/deepseek-v4-pro | $0.27 / $1.10 | $0.285 / $1.16 | — | 9 | code review, refactor, PHP backend, databases, reasoning (text only — no vision) |
| 9 | z-ai/glm-5.1 | $0.30 / $1.10 | $0.317 / $1.16 | ✅ | 8 | web design, frontend frameworks, PHP frontend, mobile, docs (vision) |
| 10 | moonshotai/kimi-k2.6 | — | ~$2.00 / $8.00 | — | 8 | long-context reasoning, Chinese/English bilingual, code |
| 11 | xiaomi/mimo-v2.5-pro | — | ~$0.50 / $2.00 | — | 7 | code reasoning, agent tasks (compact MoE) |
| 12 | minimax/minimax-m2.7 | — | ~$1.00 / $4.00 | — | 7 | long-form generation, agent workflows |
| 13 | qwen/qwen3.6-plus | — | ~$0.50 / $2.00 | — | 7 | boilerplate, PHP backend, backend API, testing, docs |
| 14 | google/gemini-2.5-pro | $1.25 / $10 | $1.32 / $10.55 | — | 9 | reasoning, debug, mobile, frontend frameworks, refactor |
effective_cost_weight = cost × 0.20 when subscription is enabled, and prefers those routes automatically.Cost Weights (v4.33 retune, 1-10 — lower = cheaper)
| Provider | Master | Senior | Junior |
|---|---|---|---|
| Anthropic | 10 | 6 | 2 |
| OpenAI | 10 | 7 | 3 |
| Gemini | 5 | 2 | 1 |
| Grok | 3 | 3 | 3 |
| DeepSeek | 3 | 3 | 3 |
| GLM | 4 | 4 | 4 |
| OpenRouter (deepseek / glm / qwen3.6-plus combo) | 2 | 2 | 2 |
Smart Weights (v4.33 retune from lmarena 2026, 1-10 — higher = stronger)
| Provider | Master | Senior | Junior |
|---|---|---|---|
| Anthropic | 10 | 9 | 7 |
| OpenAI | 10 | 9 | 7 |
| DeepSeek | 9 | 9 | 9 |
| Gemini | 9 | 6 | 4 |
| Grok | 8 | 8 | 8 |
| GLM | 8 | 8 | 8 |
| OpenRouter | 9 | 8 | 7 |
14. Developer Roles
| Role | Best For | Models |
|---|---|---|
| master_developer | Complex architecture, critical decisions | Top-tier (Opus, GPT-4o) |
| senior_developer | Features, integrations | Mid-tier (Sonnet, Gemini Pro) |
| junior_developer | Simple tasks, boilerplate, docs | Fast/cheap (Haiku, Flash) |
Role Assignment by Complexity
| Complexity | eco | balanced | performance |
|---|---|---|---|
| Trivial (docs, typos) | junior | junior | junior |
| Simple (basic features) | junior | junior | senior |
| Moderate (features, APIs) | junior | senior | senior |
| Complex (refactoring) | senior | senior | master |
| Critical (architecture) | senior | master | master |
15. Think Mode (Extended Thinking)
| Mode | Description | Best For |
|---|---|---|
| off | No extended thinking | Simple tasks |
| basic | Light reasoning | Standard features |
| balanced | Moderate analysis | Most tasks (default) |
| ultra | Deep reasoning | Complex architecture, debugging |
Provider Types
| Type | Providers | How It Works |
|---|---|---|
| Type A | Anthropic, Gemini | Configurable token budget |
| Type B | OpenAI | Maps to reasoning levels (low/medium/high) |
| Type C | DeepSeek, GLM, Grok, OpenRouter | Binary: on or off |
| None | Ollama, vLLM | No thinking support |
16. Vision Support
Some providers can "see" — analyze screenshots, UI layouts, and visual content.
| Provider | Vision | Use For |
|---|---|---|
| Anthropic | Yes | UI verification, styling, visual QA |
| Gemini | Yes | UI verification, styling |
| GLM | Yes | UI verification (auto-switches model) |
| Grok | Yes | UI verification |
| OpenAI | Yes | UI verification |
| OpenRouter | Depends | Depends on underlying model |
| DeepSeek | No | Backend only |
| Ollama | No | Backend only |
| vLLM | No | Backend only |
17. Code Editor
The built-in Monaco Editor provides VS Code-quality editing in your browser.
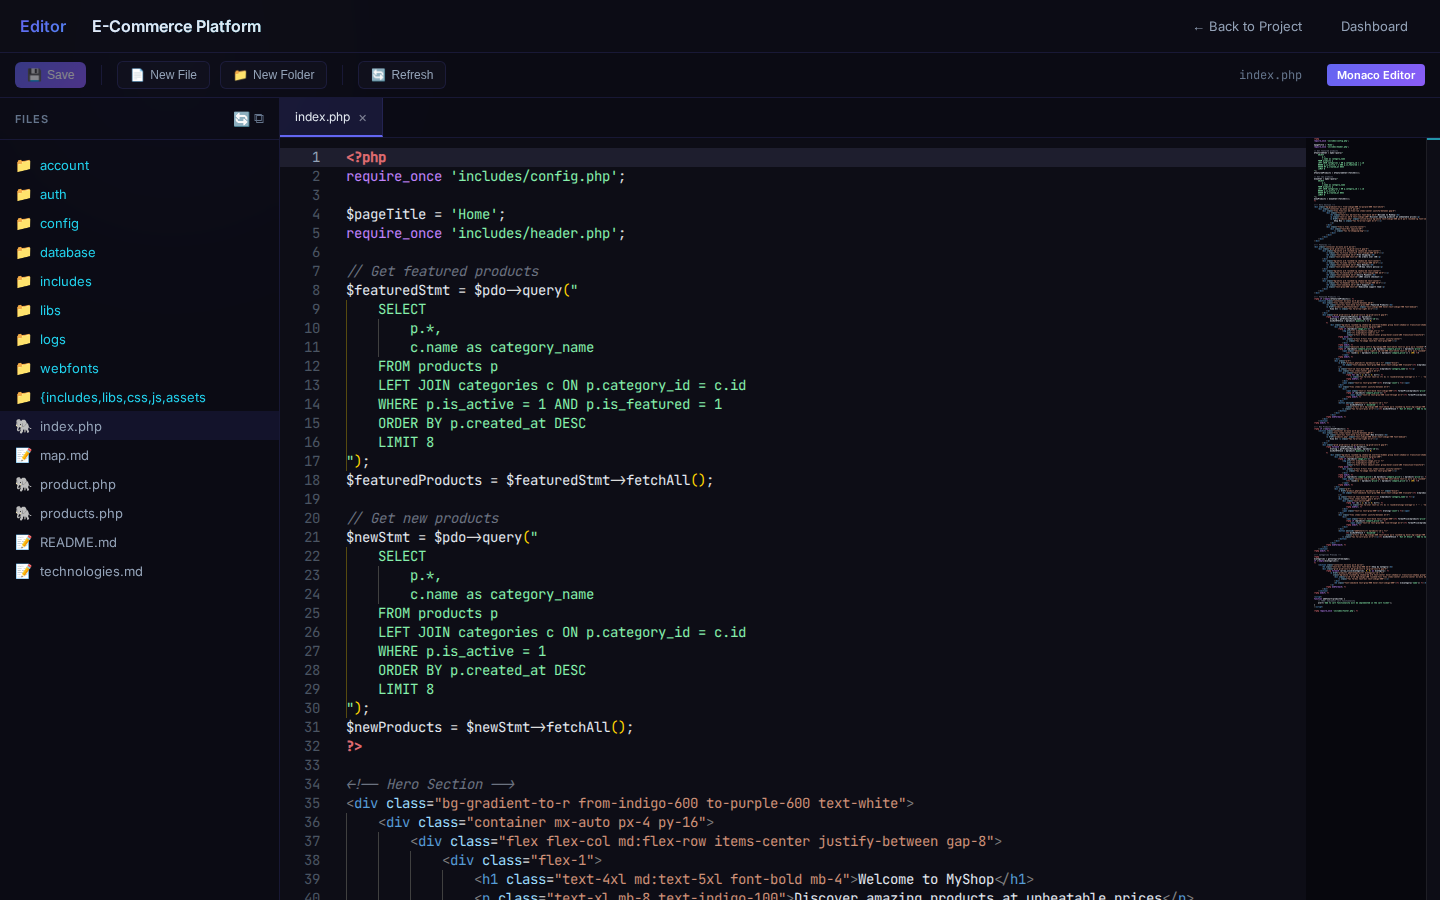
- Syntax highlighting for all major languages
- Autocomplete with LSP integration
- Hover documentation — hover over functions for docs
- Go-to-definition — Ctrl+Click to jump to definitions
- Real-time error detection — squiggly lines for errors/warnings
- Multi-tab editing
- File tree — navigate project files in sidebar
- Search & replace — Ctrl+H
- Minimap — code overview on the right
sudo /opt/codehero/scripts/setup_lsp.sh to install language servers for full IDE features.18. File Explorer
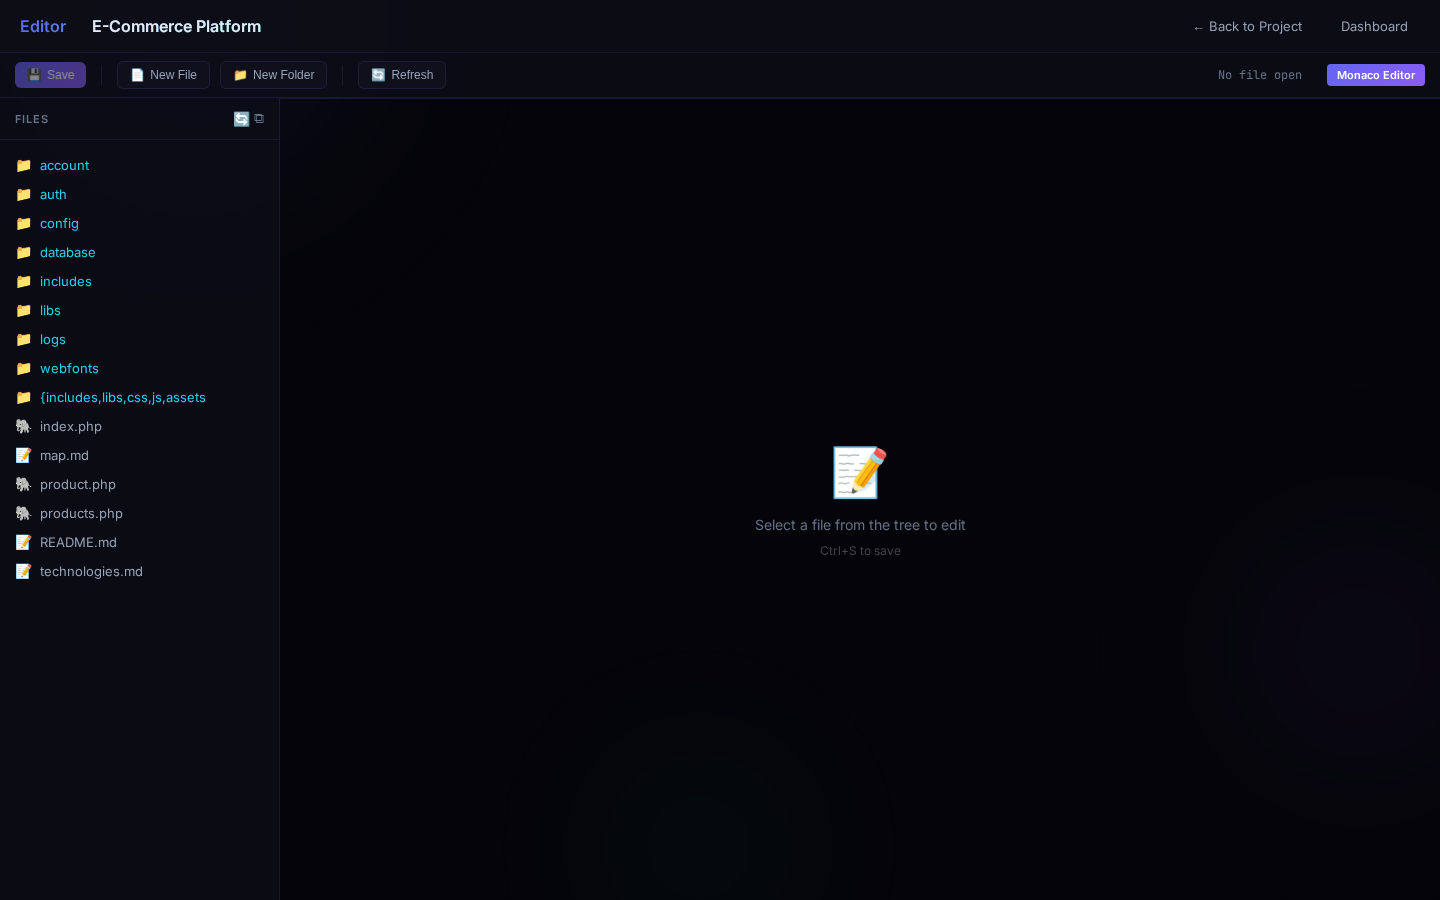
- Directory tree with expand/collapse
- File preview for text, images, and code
- Upload via drag-and-drop or file picker
- Create, rename, delete files and folders
- Download files
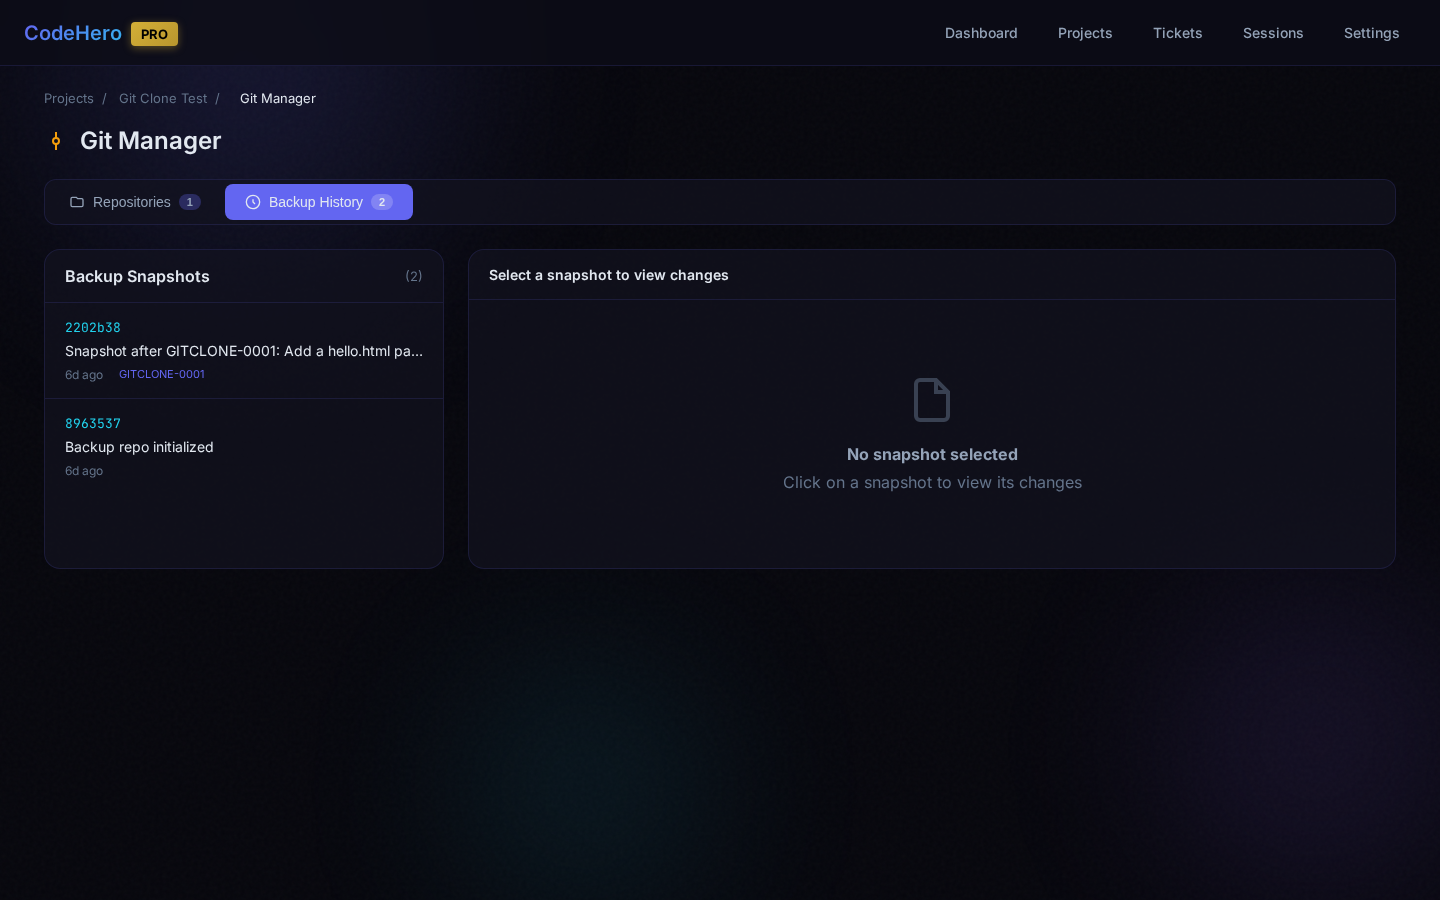
19. Git Manager
Full version control through the web interface.
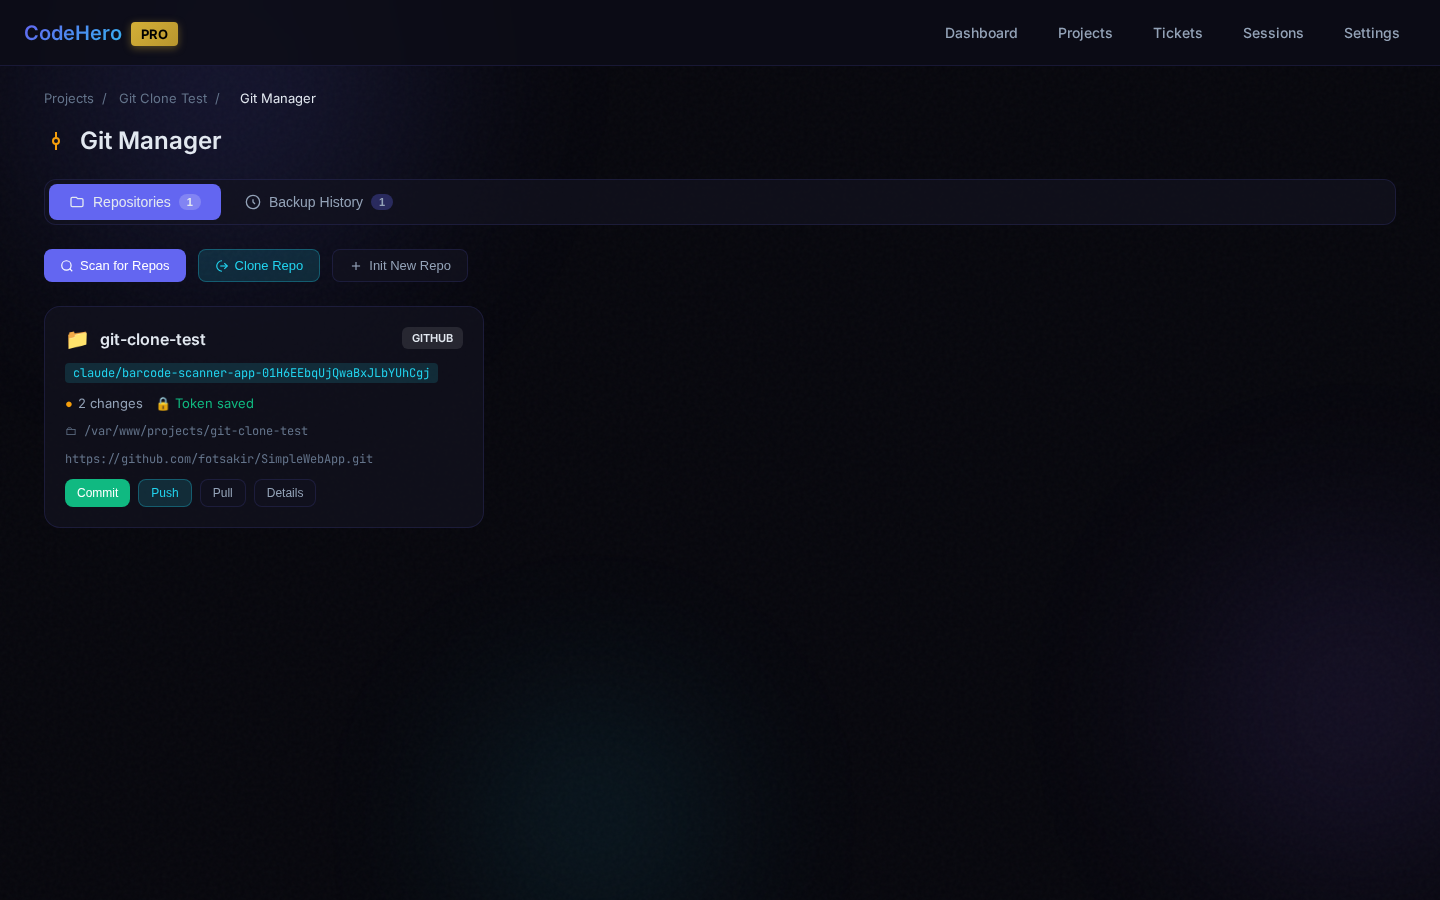
CodeHero automatically detects Git repositories in your project directory. Multiple repos per project are supported.
Clone & Init
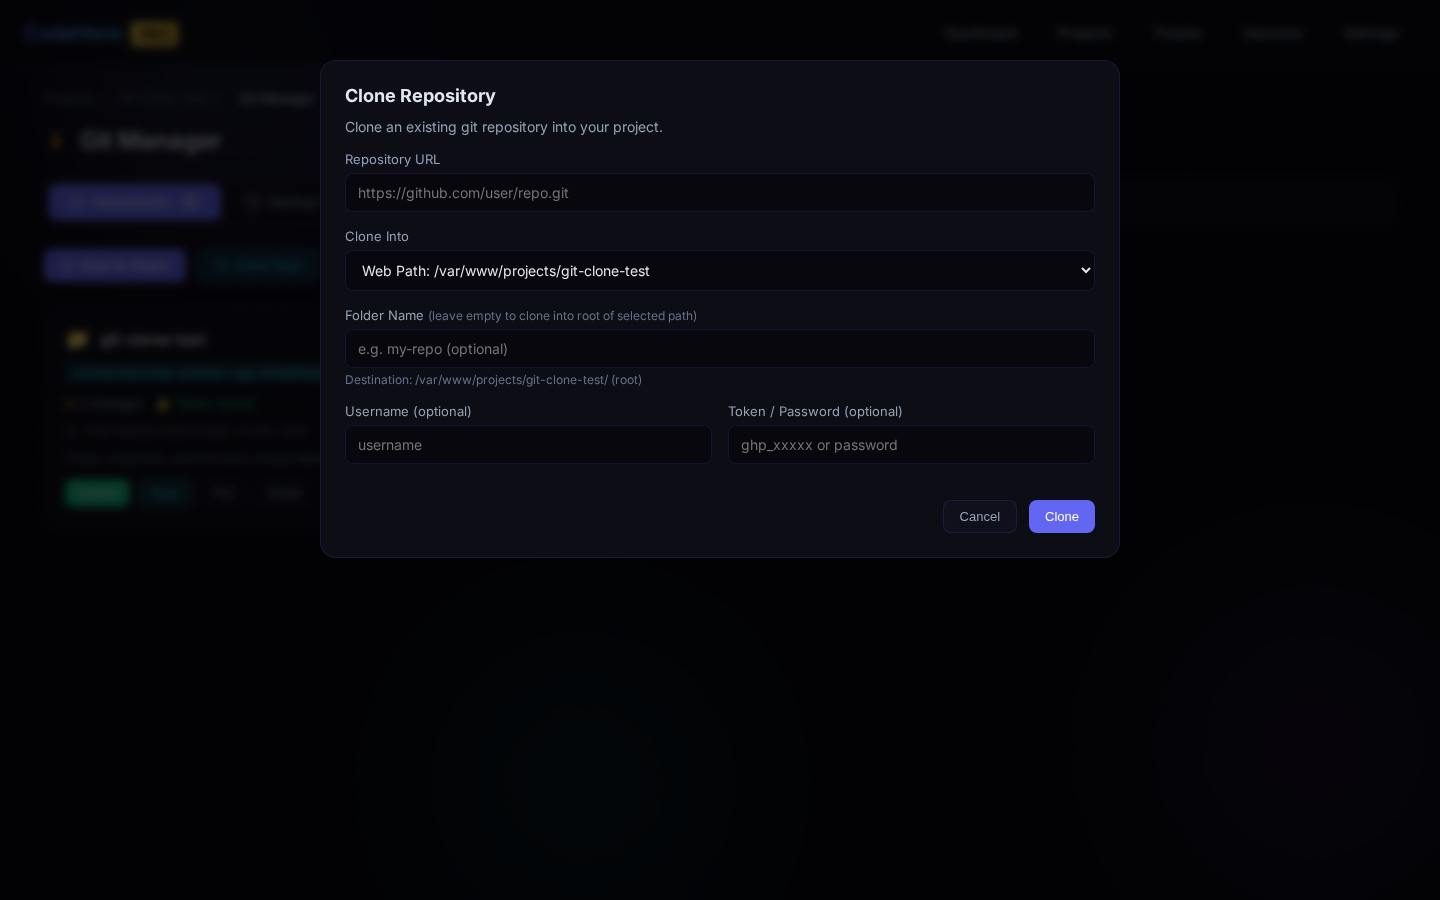
Clone remote repositories (HTTPS/SSH), initialize new repos, and store Git credentials per repository.
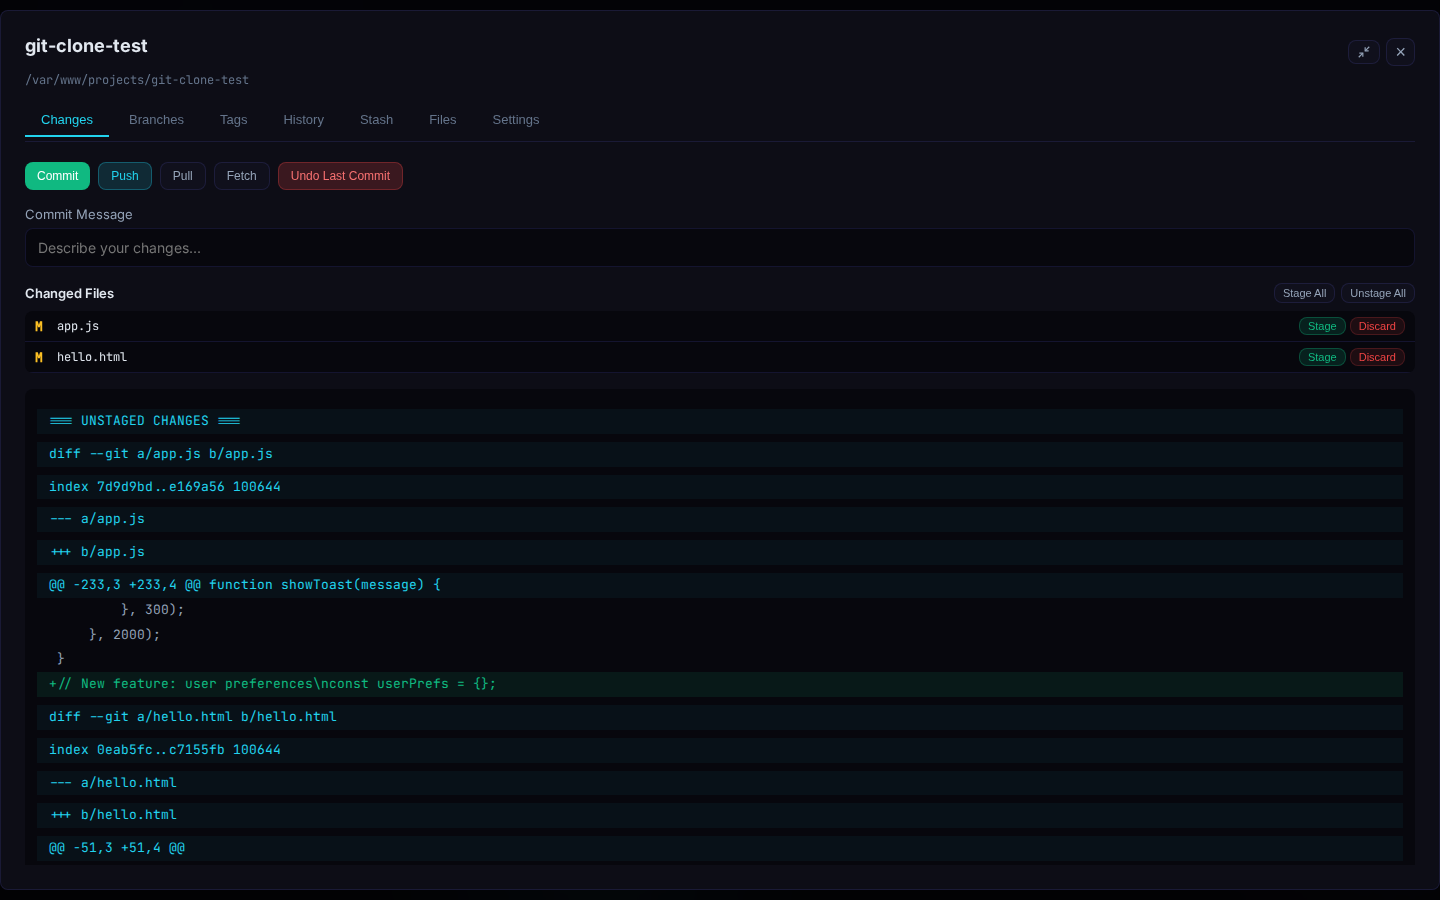
Changes & Commits
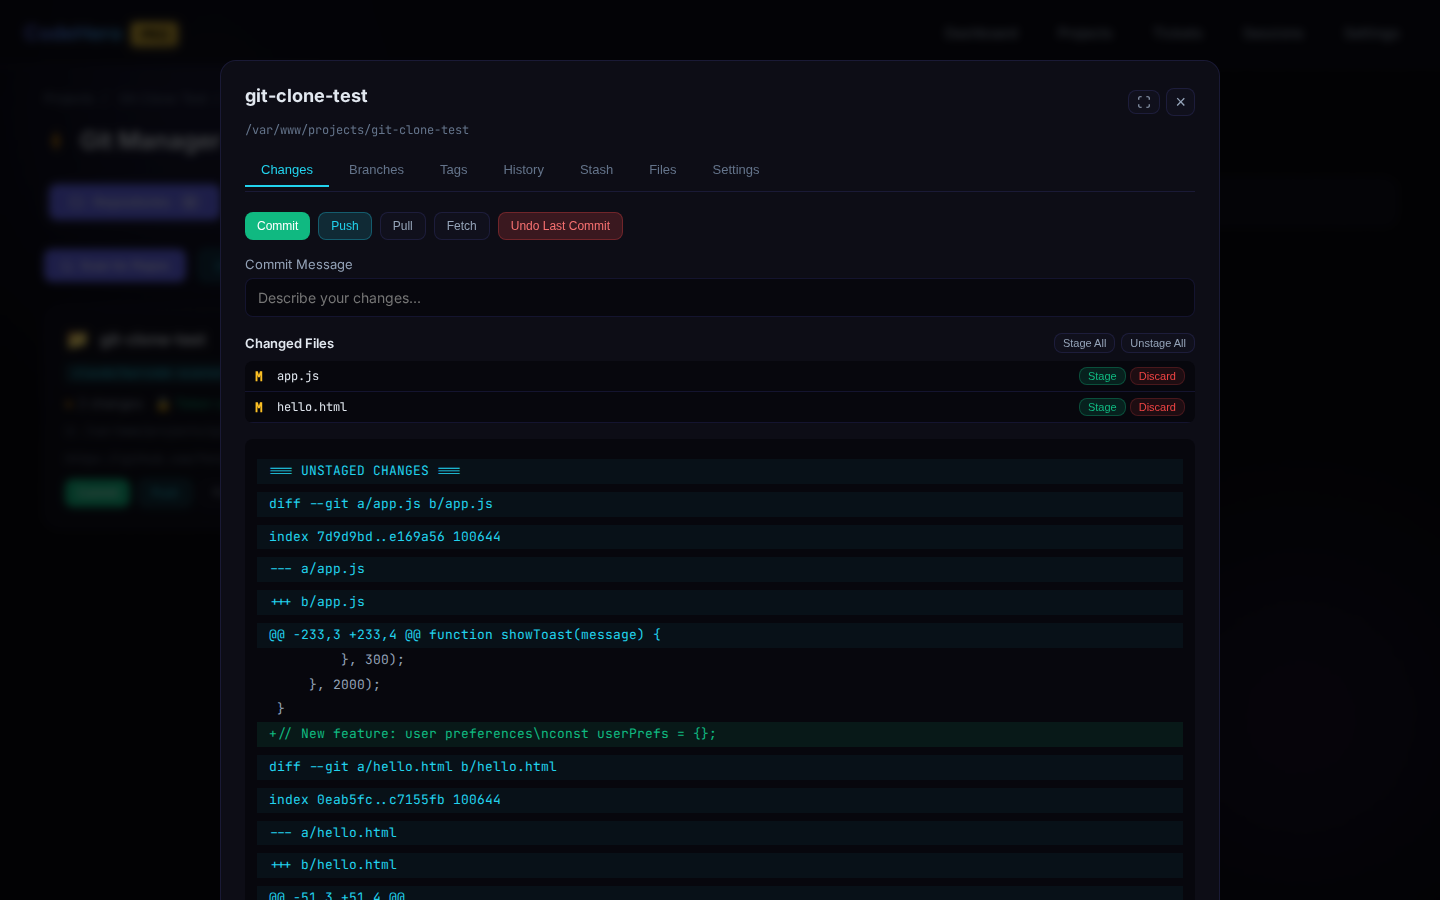
Status overview, stage/unstage files individually or all at once, commit with message editor, and inline diff viewer.
Branches
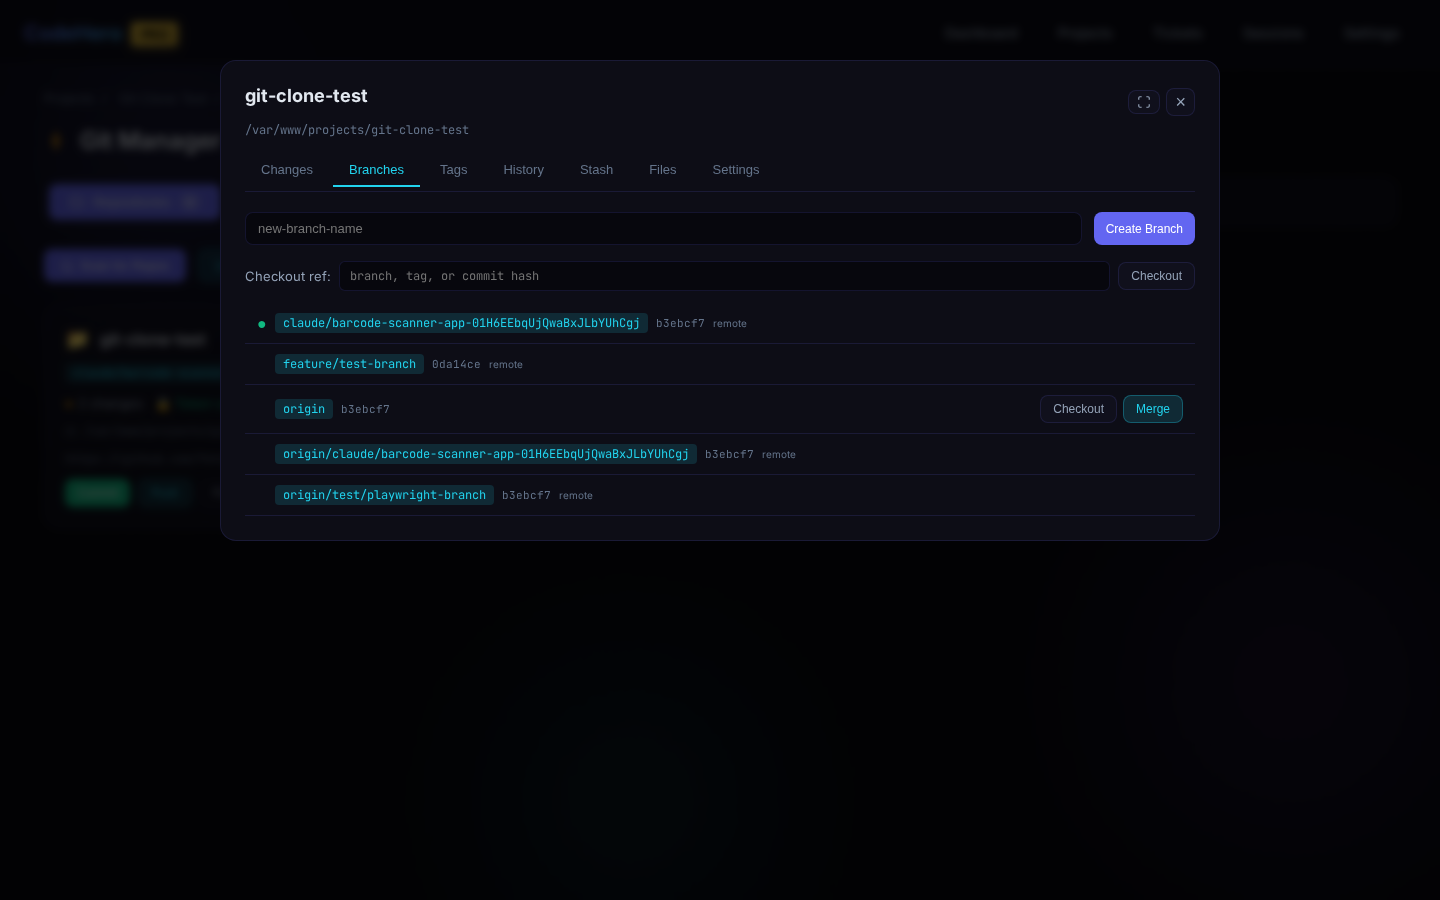
View local and remote branches, create, checkout, merge with conflict resolution, and delete.
Tags
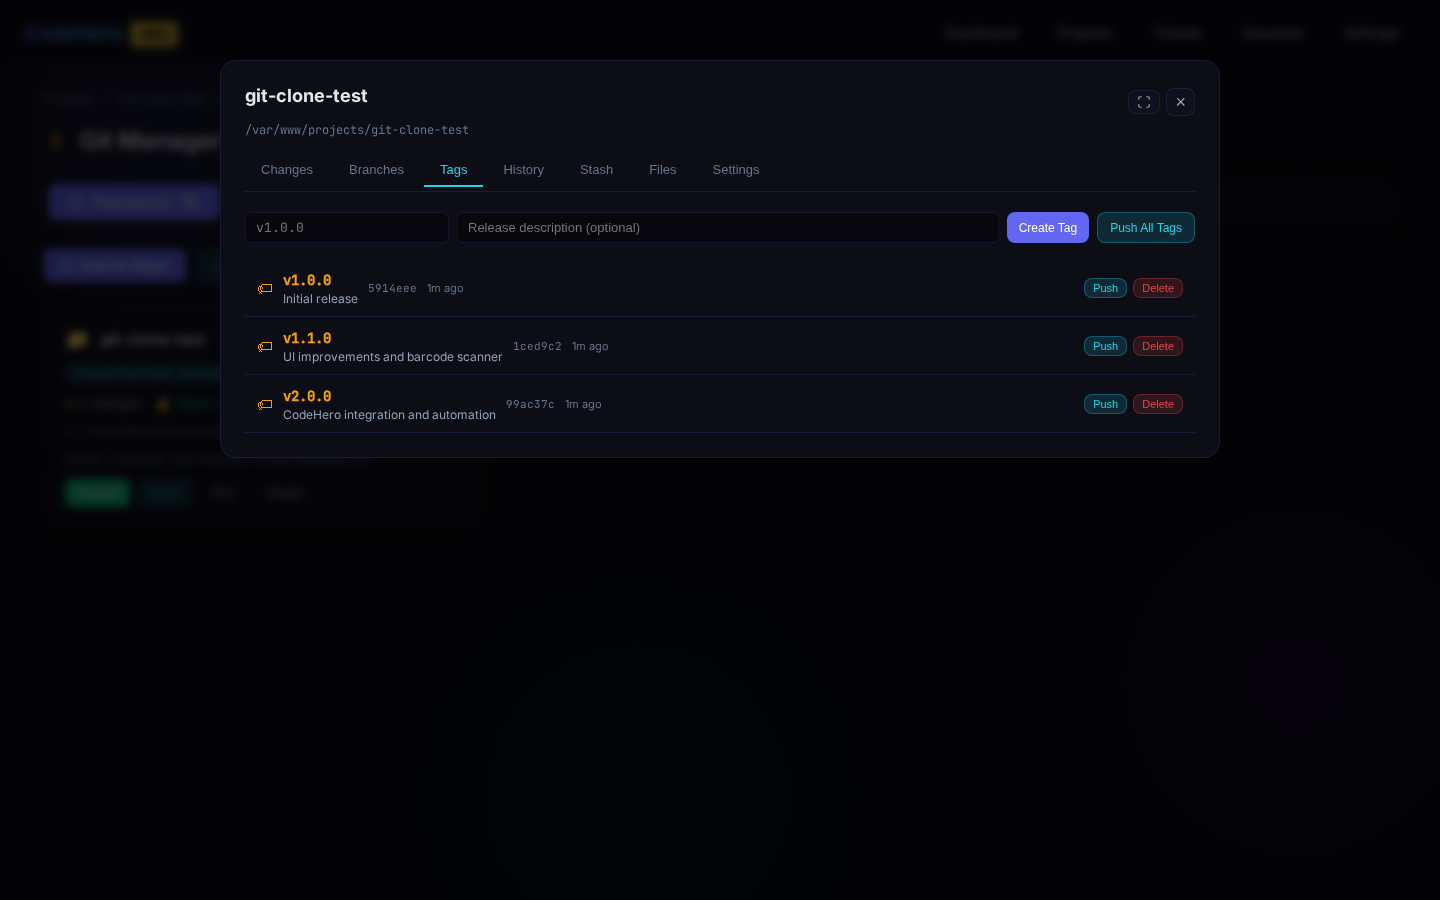
View, create (lightweight and annotated), push, and delete tags.
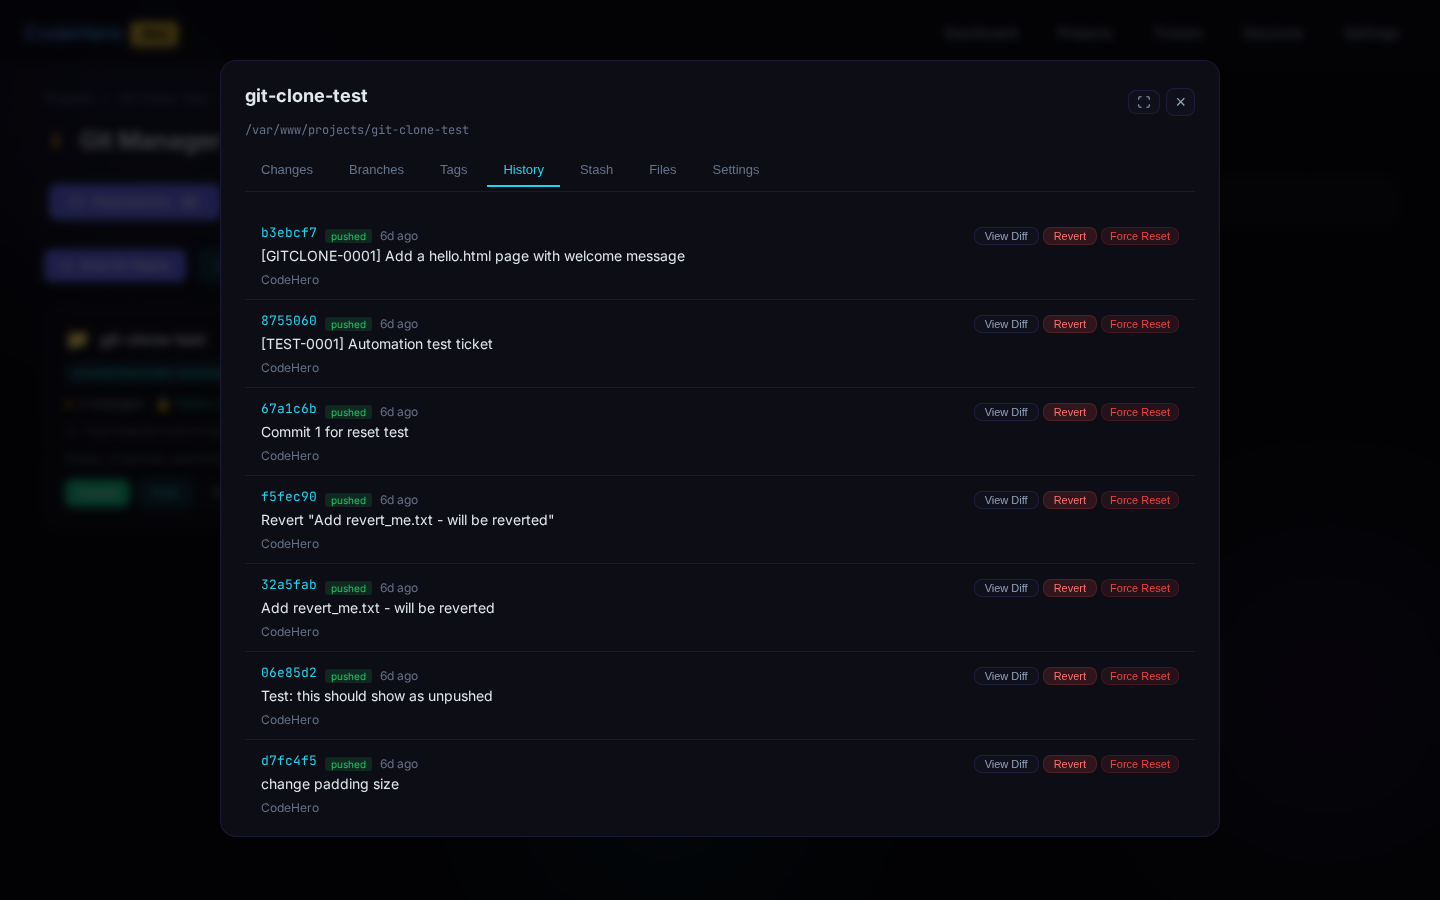
History
Commit log with author, date, message. Diff viewer per commit. Revert specific commits. Reset to any commit (soft/mixed/hard).
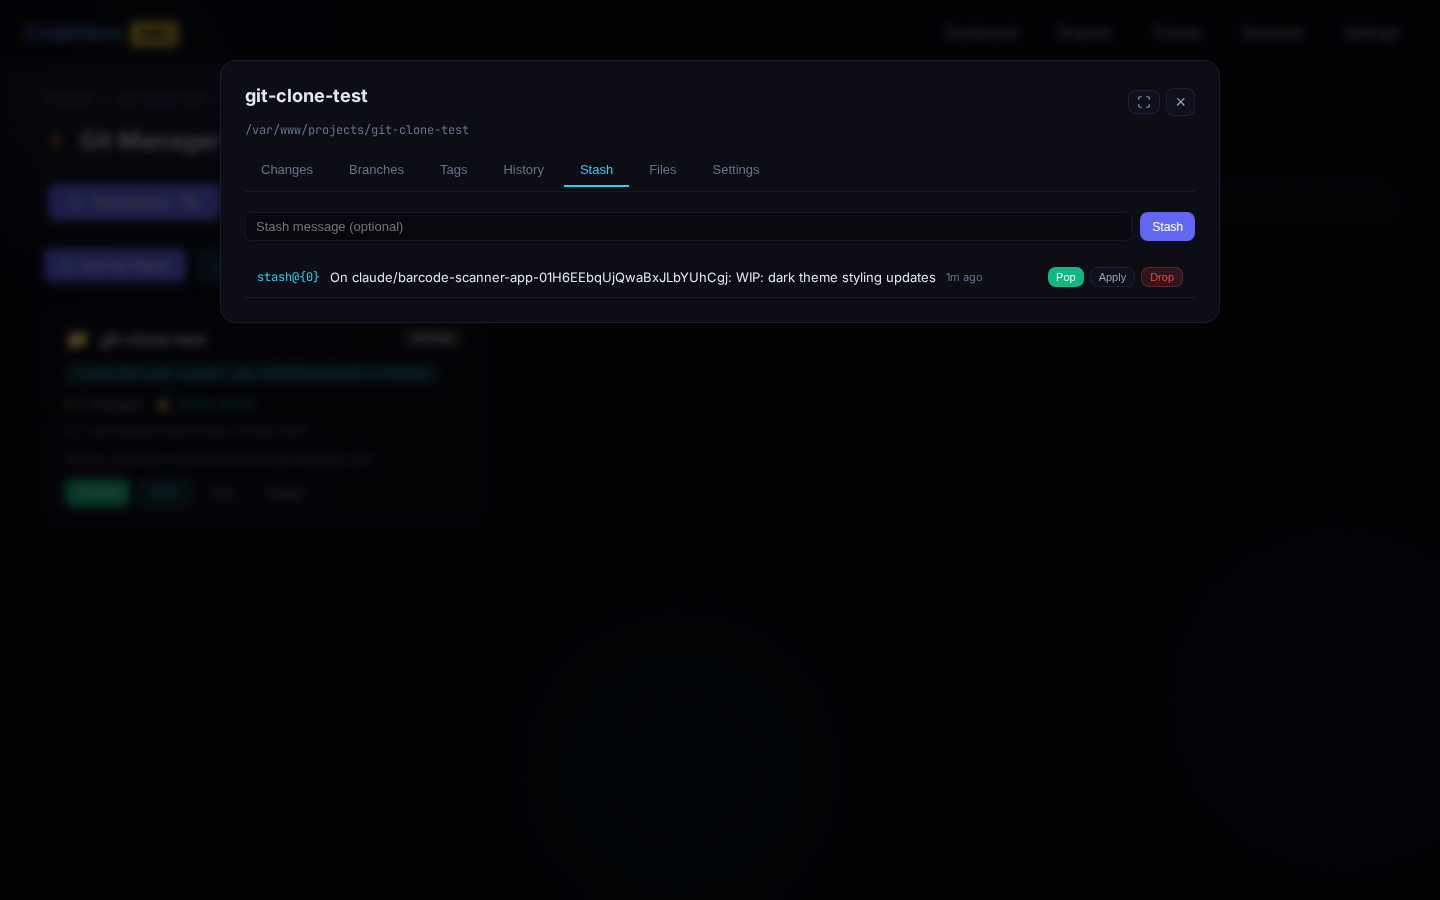
Stash
Stash current changes, list stashes, apply/pop, and drop.
Diff Viewer
Full-screen diff with inline or side-by-side comparison, syntax highlighting, and line-by-line navigation.
Backup History
Auto-Commit & Auto-Push
Configure per repository: auto-commit when AI completes a ticket, auto-push after auto-commit.
Settings
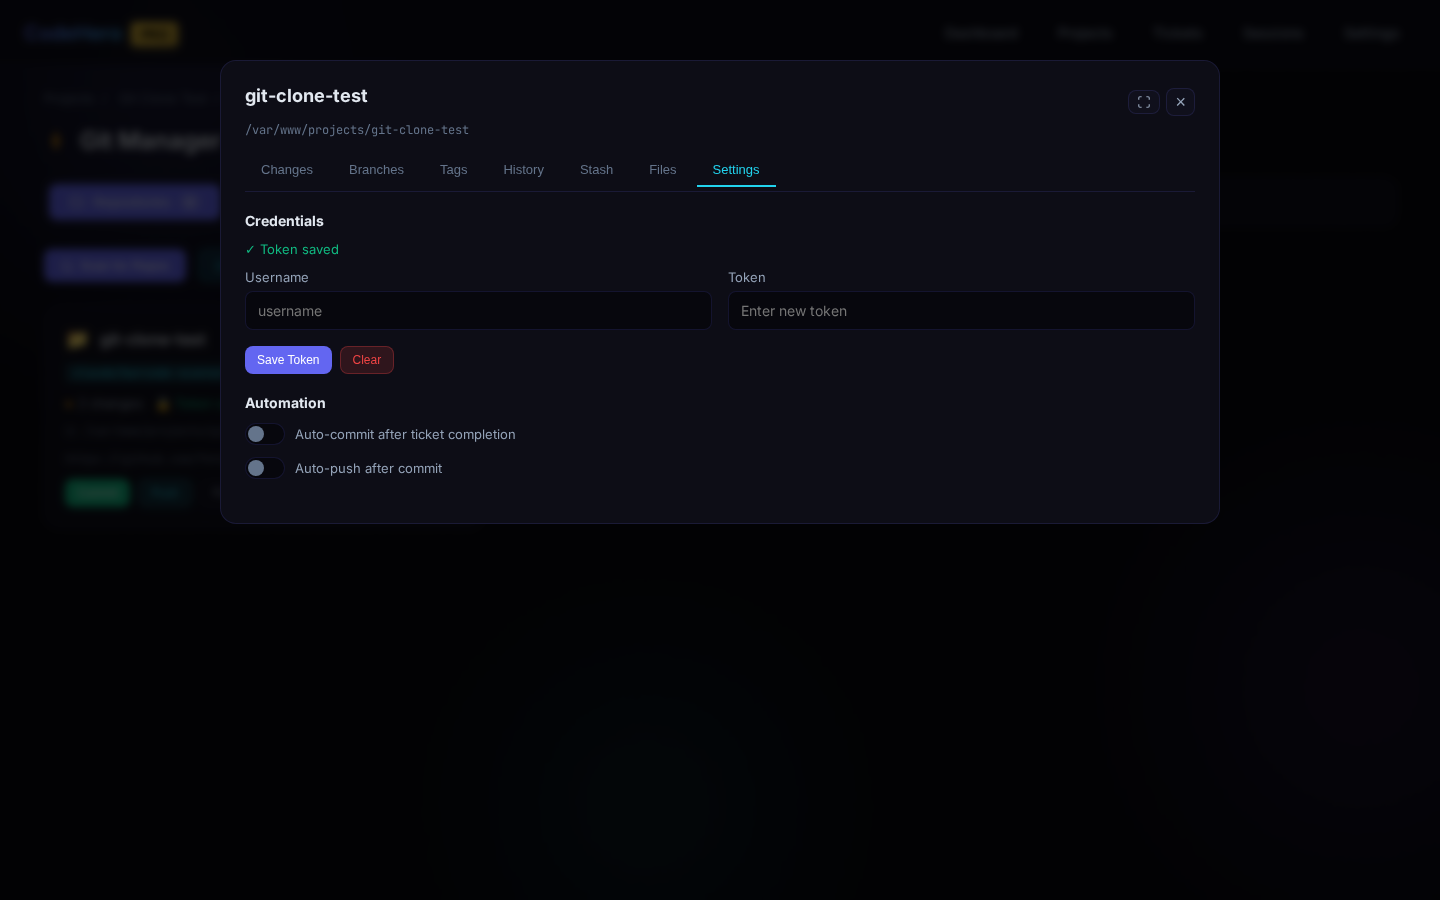
Remote URL management, credentials, auto-commit/auto-push toggles, default branch configuration.
20. Console (Real-time Output)
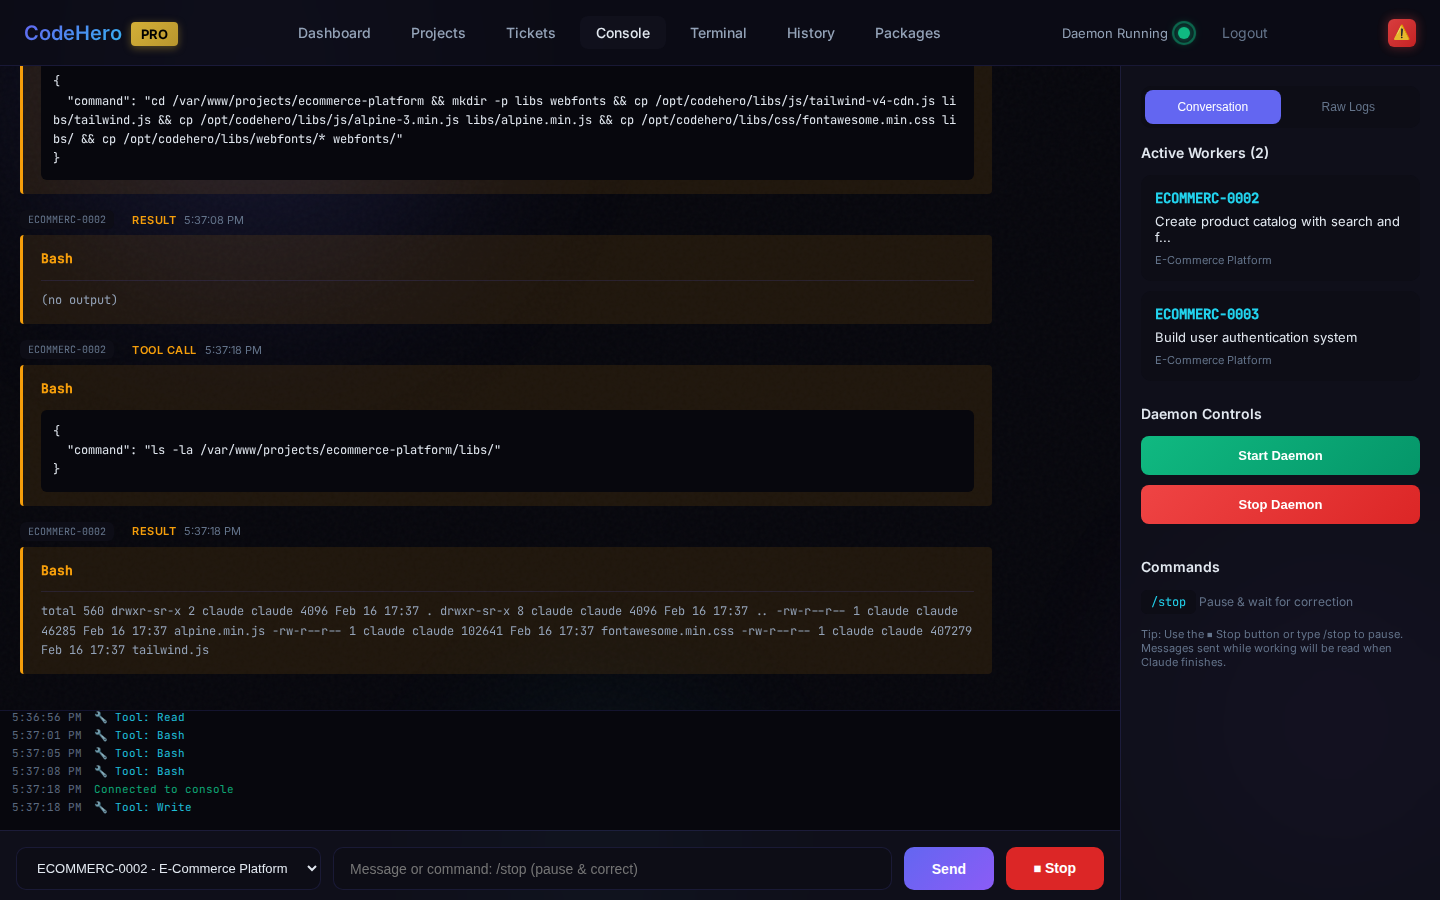
- Live streaming — See AI output as it happens
- Auto-scroll — Automatically follows new content
- Pause/Resume — Pause scrolling to read
- Color-coded — Different colors for different output types
21. Web Terminal
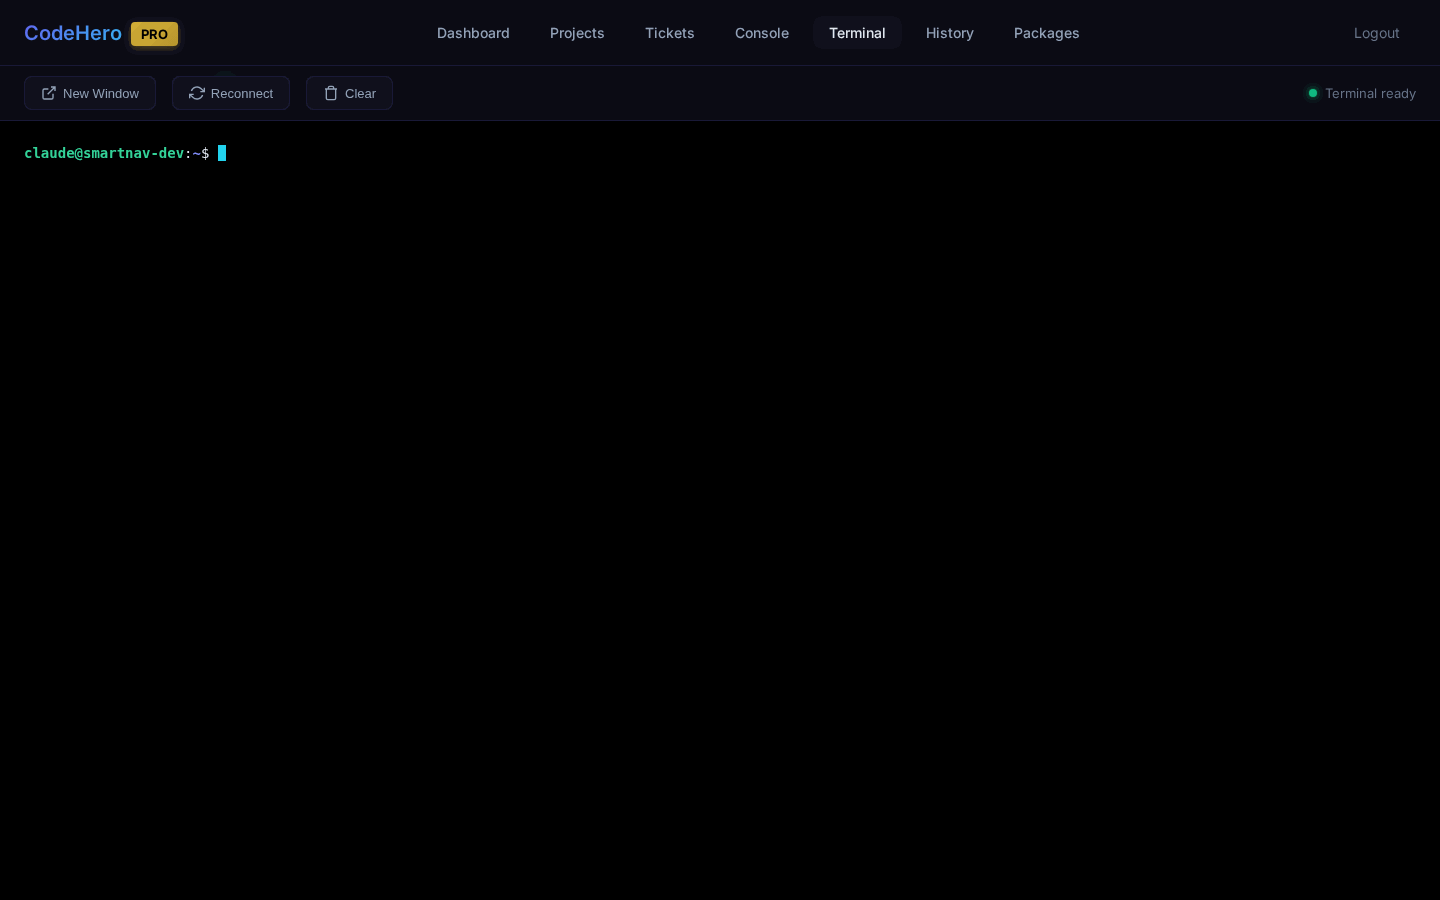
- Real shell access — Full PTY terminal via WebSocket
- Popup support — Open in popup for multi-monitor
- Full sudo access
- 256-color support with xterm.js
- Copy/paste — Standard clipboard operations
22. Package Manager
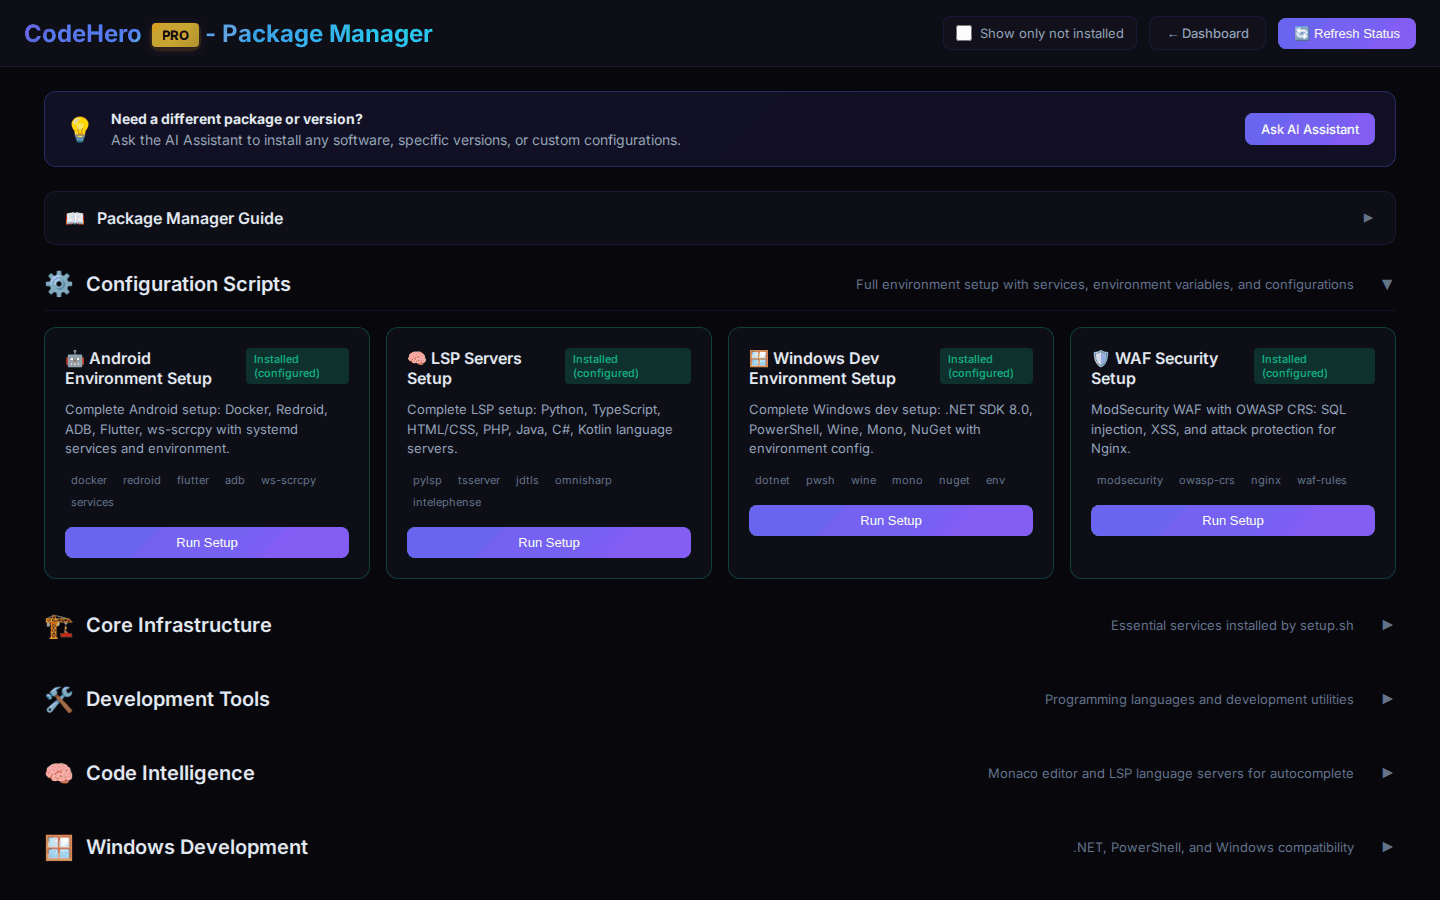
| Package | What It Installs |
|---|---|
| Development Tools | Node.js 22, Java (GraalVM 24), ffmpeg, ImageMagick, tesseract |
| Android Development | Docker, Redroid emulator, ws-scrcpy, ADB, Flutter, Gradle |
| Windows/.NET | .NET 8 SDK, PowerShell 7, Wine, Mono, NuGet |
| Code Editor LSP | Language servers for Python, JS/TS, PHP, Java, C#, Kotlin, HTML/CSS |
23. Session History
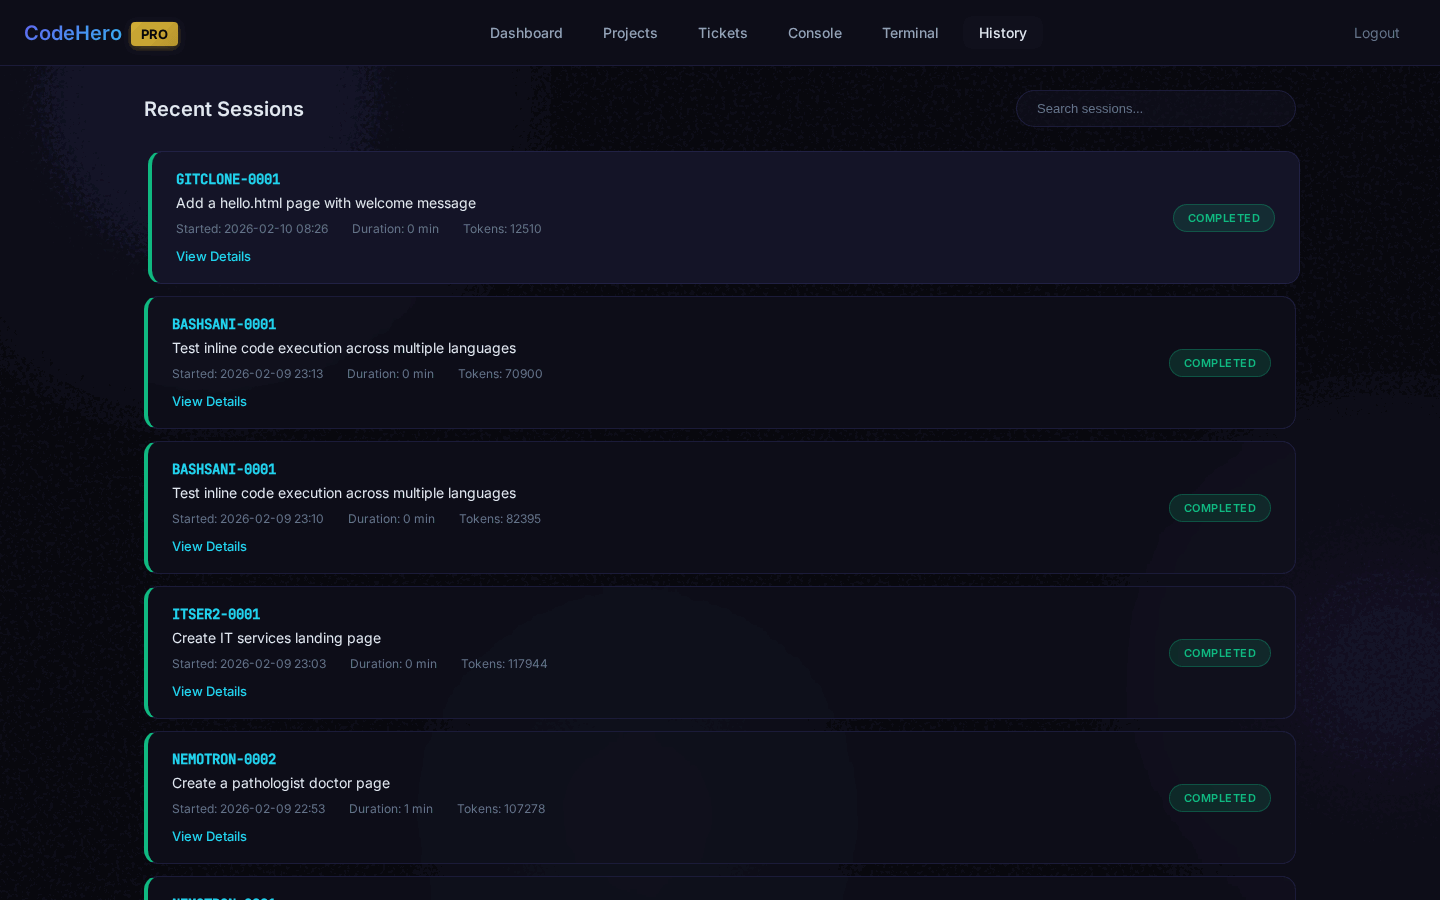
View all past AI execution sessions: start/end times, duration, exit codes (0 = success), associated ticket, token usage, and full session log. Filter by date, project, or status.
24. Project Progress
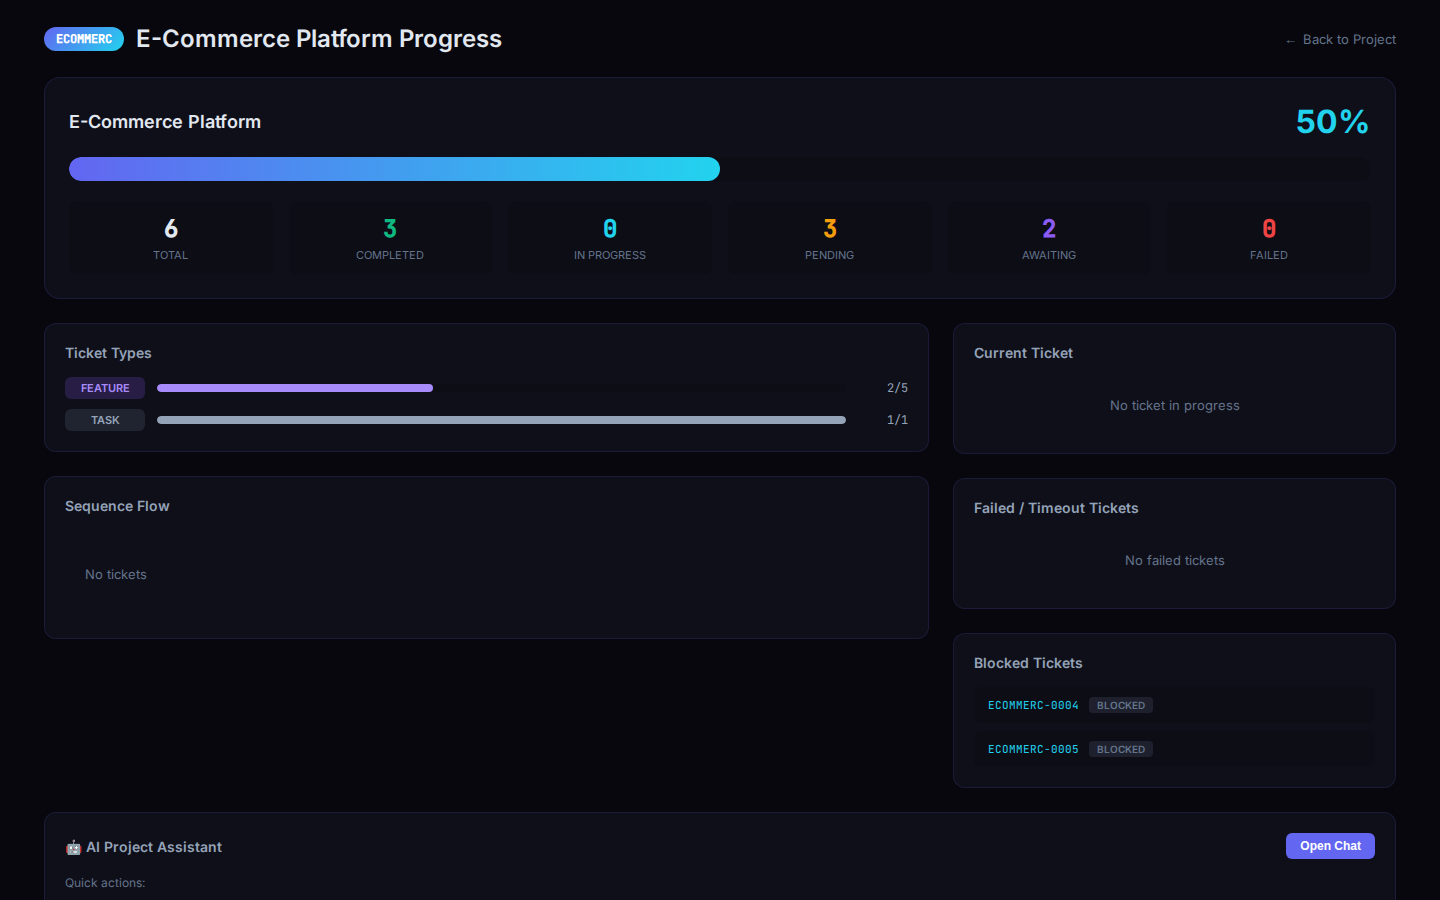
Visual overview: completion percentage, ticket counts by status/type, sequence flow visualization, model distribution, and built-in AI assistant for project-specific chat.
25. Kill Switch
Instantly stop the AI when it's working on a ticket.
| Method | How |
|---|---|
| Stop Button | Red button appears when ticket is in_progress |
| /stop Command | Type /stop in the chat field |
| AI Assistant | Ask: "Stop ticket PROJ-0001" |
What happens: AI process receives SIGTERM, ticket status changes to awaiting_input, you can provide new instructions or corrections.
26. AI Assistant
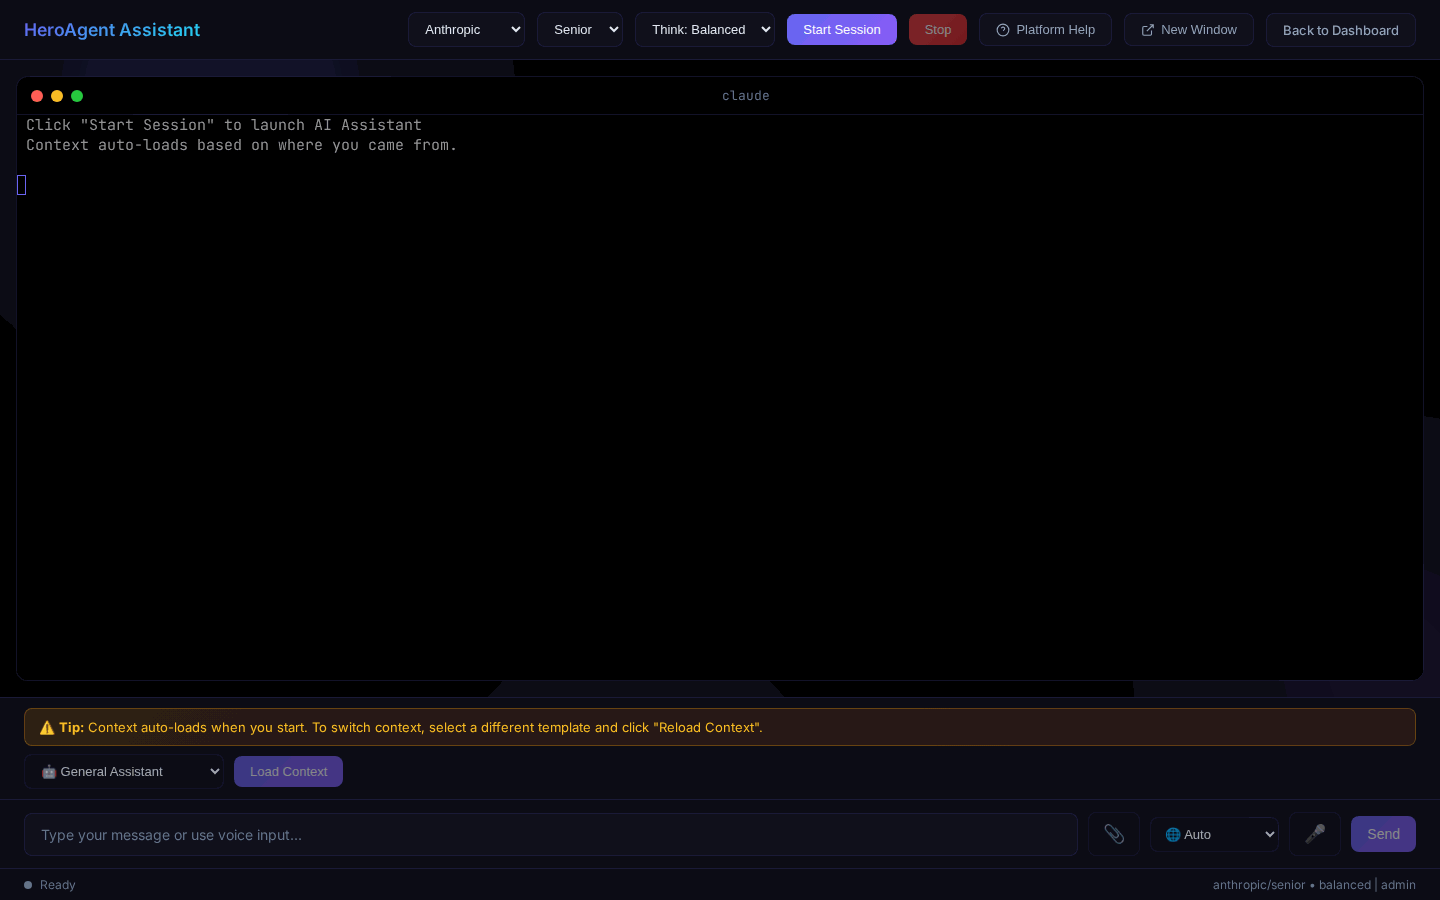
- Provider selection — Choose any active provider
- Model selection — Pick developer role
- Session management — Multiple chat sessions, saved history
- Popup window — Open in separate window
- Voice input — Speak instead of typing
- File upload — Share files with the AI
AI Project Manager
From the Projects page, click "Plan with AI" to start a guided project planning session. The AI suggests architecture, generates ticket plans with dependencies, and creates all tickets.
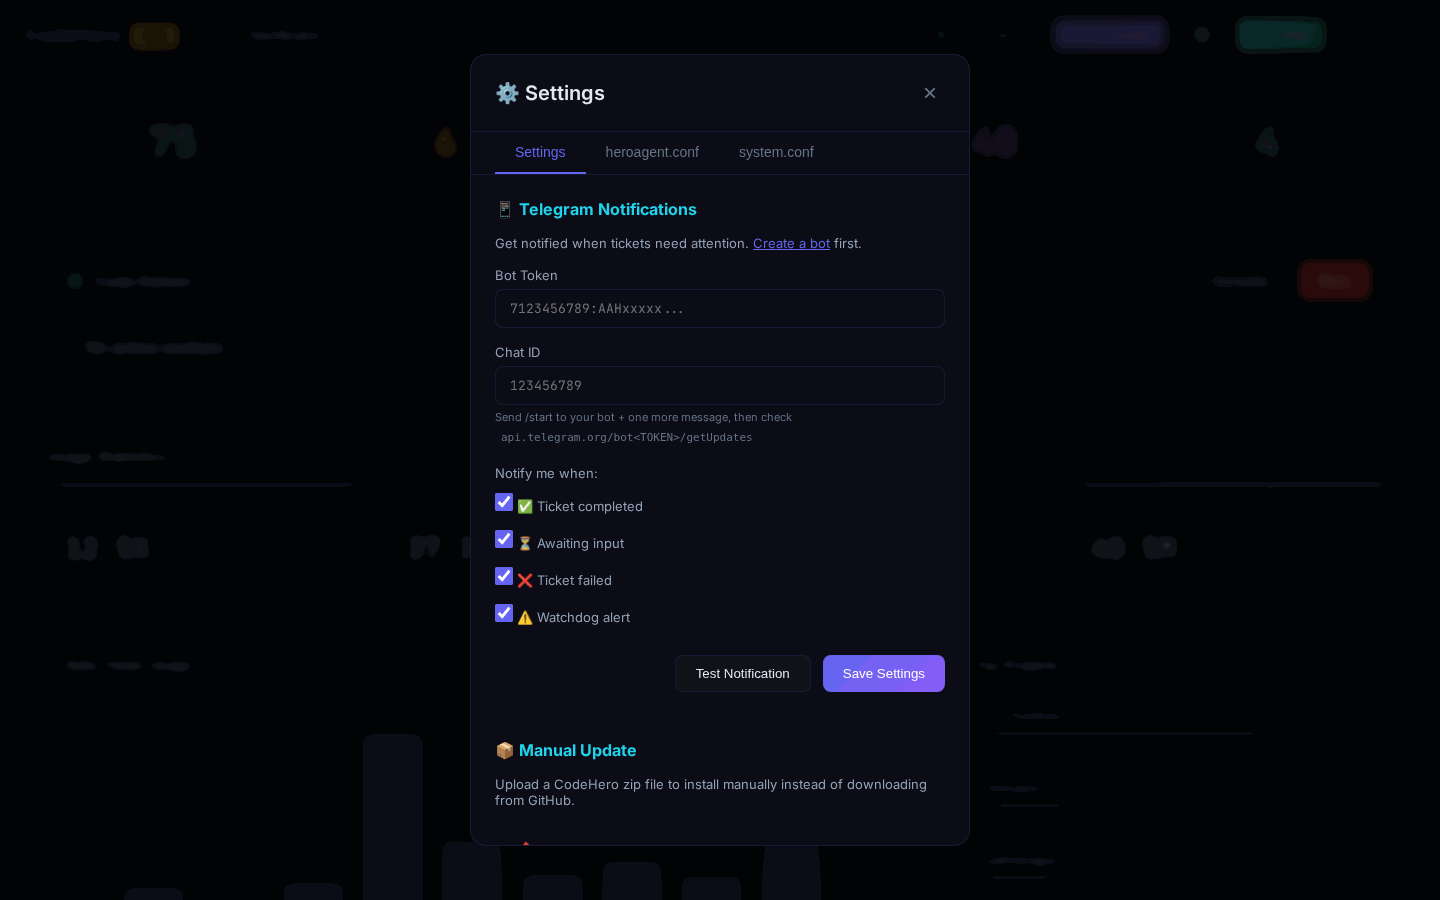
27. Telegram Notifications
Setup
- Create a Telegram Bot via @BotFather — send
/newbot, copy the token - Start a chat with your bot and send a message
- Get your Chat ID from
https://api.telegram.org/bot<TOKEN>/getUpdates - Configure in Settings — paste Bot Token and Chat ID, select notification types, Test & Save
Notification Types
| Event | Description |
|---|---|
| Awaiting Input | AI completed and needs review |
| Task Failed | Something went wrong |
| Watchdog Alert | Ticket appears stuck |
Two-Way Communication
Reply directly to notifications from your phone. Start with ? for status queries without reopening the ticket.
28. Settings & Configuration
Access all configuration from the Settings button in the header. The modal has 7 tabs:
Settings (General)
- Dashboard password — Change the admin password
- Session timeout — Auto-logout after inactivity
- Theme — Dark mode (default)
- Provider API keys — Configure keys for Anthropic, OpenAI, Gemini, DeepSeek, Grok, GLM, OpenRouter
- Telegram — Bot token, Chat ID, notification preferences
License
View license status, activation date, and expiry. Enter or update your license key.
Certificates
- Self-signed — Auto-generated on install (default)
- Let's Encrypt — Request free SSL certificates for your domain
- Custom — Upload your own certificate and private key
Domains
Configure custom domains for the dashboard and web project previews. The system auto-configures Nginx virtual hosts.
heroagent.conf
Edit the main agent configuration file directly. Controls model aliases, token limits, provider settings, and daemon behavior. Auto-backup is created before each save.
system.conf
Edit system-level configuration: Nginx settings, PHP-FPM settings, and other server parameters.
Security
- Change Password — Update the dashboard admin password
- Two-Factor Authentication — Enable/disable 2FA with TOTP (Google Authenticator, Authy). Includes QR code setup and backup codes.
29. System Updates
Dashboard Update
- A green "Update Available" badge appears in the header
- Click to see release notes
- Click "Install Update"
- Watch real-time console output
- Page auto-reloads on success
Command Line Update
cd /root
# Extract the ZIP file provided with your CodeHero PRO license
unzip codehero-pro-release-4.6.3.zip
cd codehero
sudo ./upgrade.sh| Option | Description |
|---|---|
--dry-run | Preview changes without applying |
-y, --yes | Auto-confirm all prompts |
30. Config File Editor
Edit system configuration files directly from the web interface:
- heroagent.conf — Main agent configuration (providers, models, tokens)
- Nginx config — Web server settings
- PHP config — PHP-FPM settings
Features: syntax-highlighted editor, auto-backup before saving, restore from backup, validation before apply.
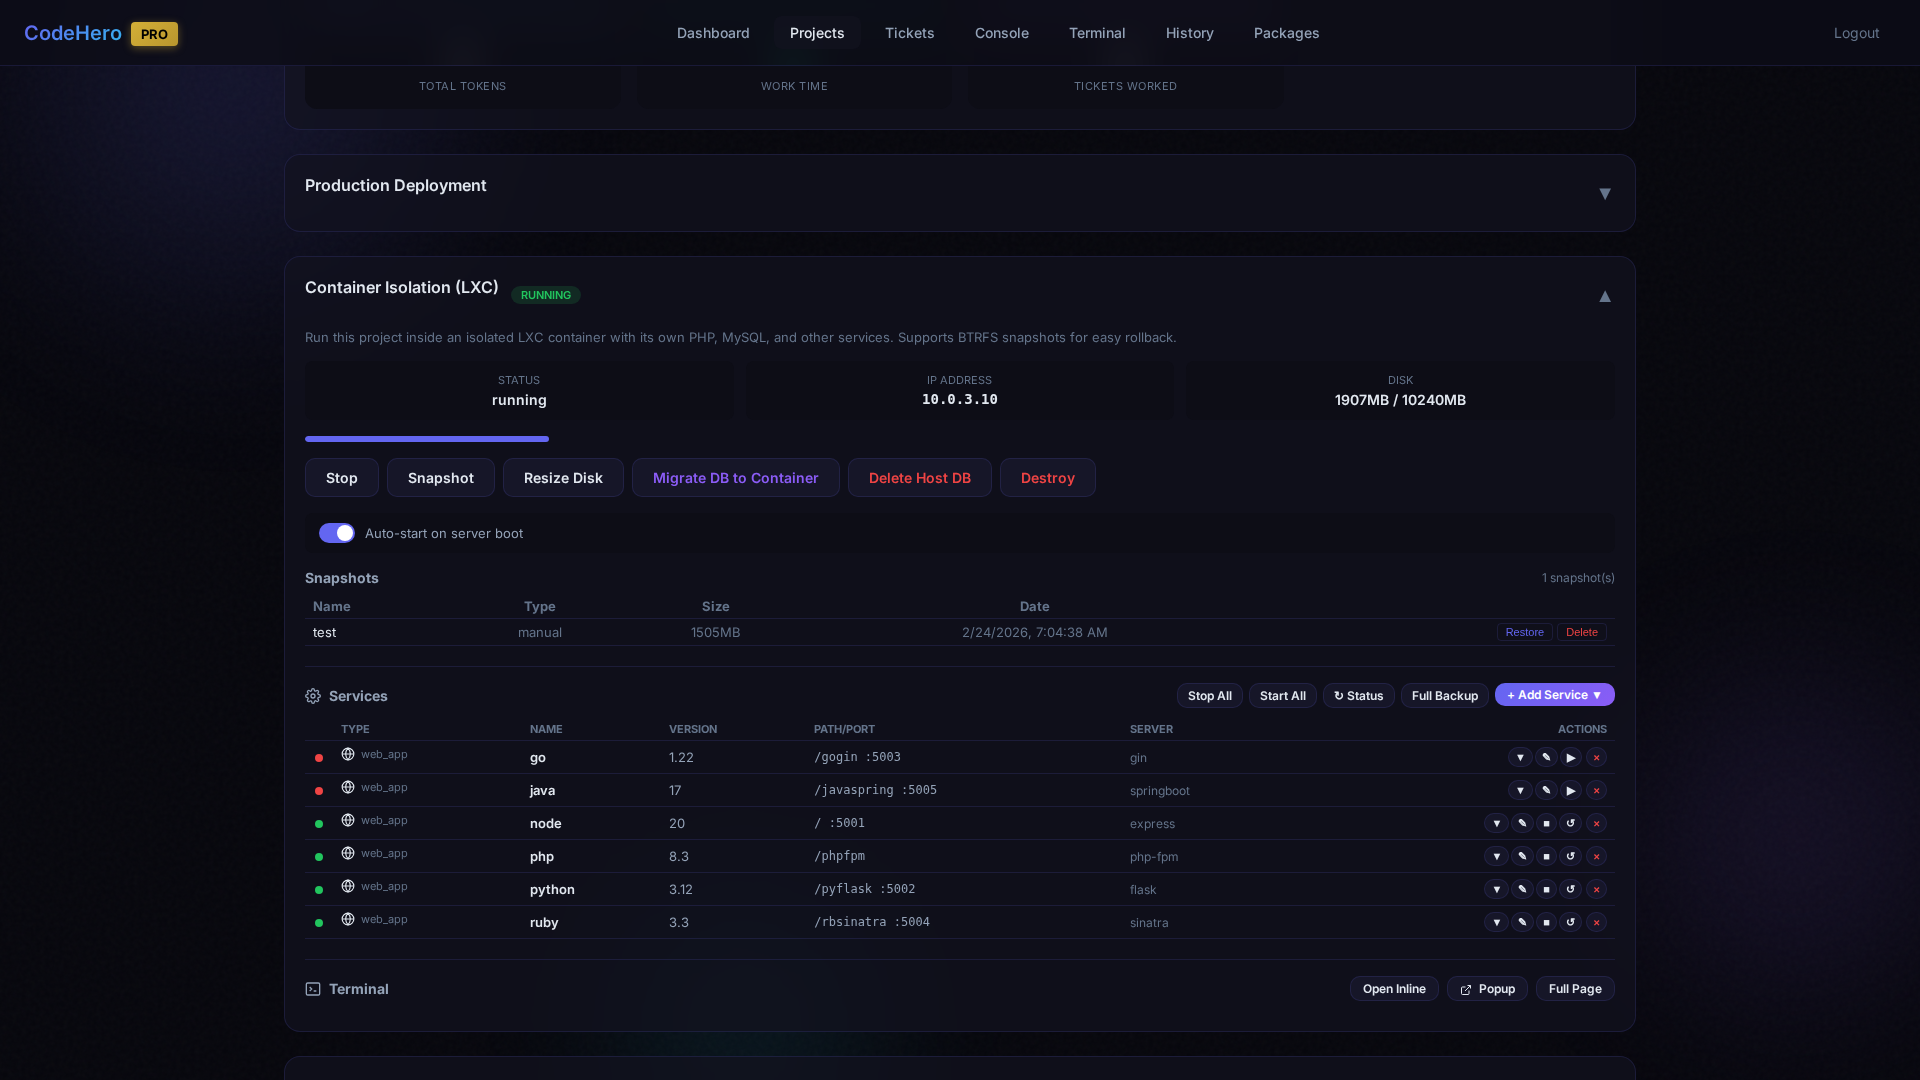
31. Container Isolation (LXC)
Run each project in its own LXC container with a full service stack. Since v4.6.3, containers include a Service Manager for installing web apps, databases, and caches from a built-in catalog.
Setting Up a Container
- Go to Project Detail page
- Scroll to Container Isolation (LXC) section
- Select Base Image (Ubuntu 24.04 recommended), Disk Size (5-50 GB)
- Optionally enable Auto-Snapshot and DB Migration
- Click "Create Container"
Container Management
| Action | Description |
|---|---|
| Start / Stop | Boot or gracefully shut down the container |
| Resize Disk | Increase BTRFS volume size |
| Snapshot | Instant BTRFS snapshot with automatic DB freeze |
| Migrate DB | Move host database into the container |
| Destroy | Remove container and all data |
| Auto-start on server boot | Toggle to automatically start the container when the server reboots (enabled by default) |
Snapshots
BTRFS snapshots provide instant backup and restore:
- Create Snapshot — Save current container state. Databases are automatically flushed/frozen for consistency.
- Restore Snapshot — Roll back to any previous state instantly. All services and data revert.
- Delete Snapshot — Remove old snapshots to reclaim disk space.
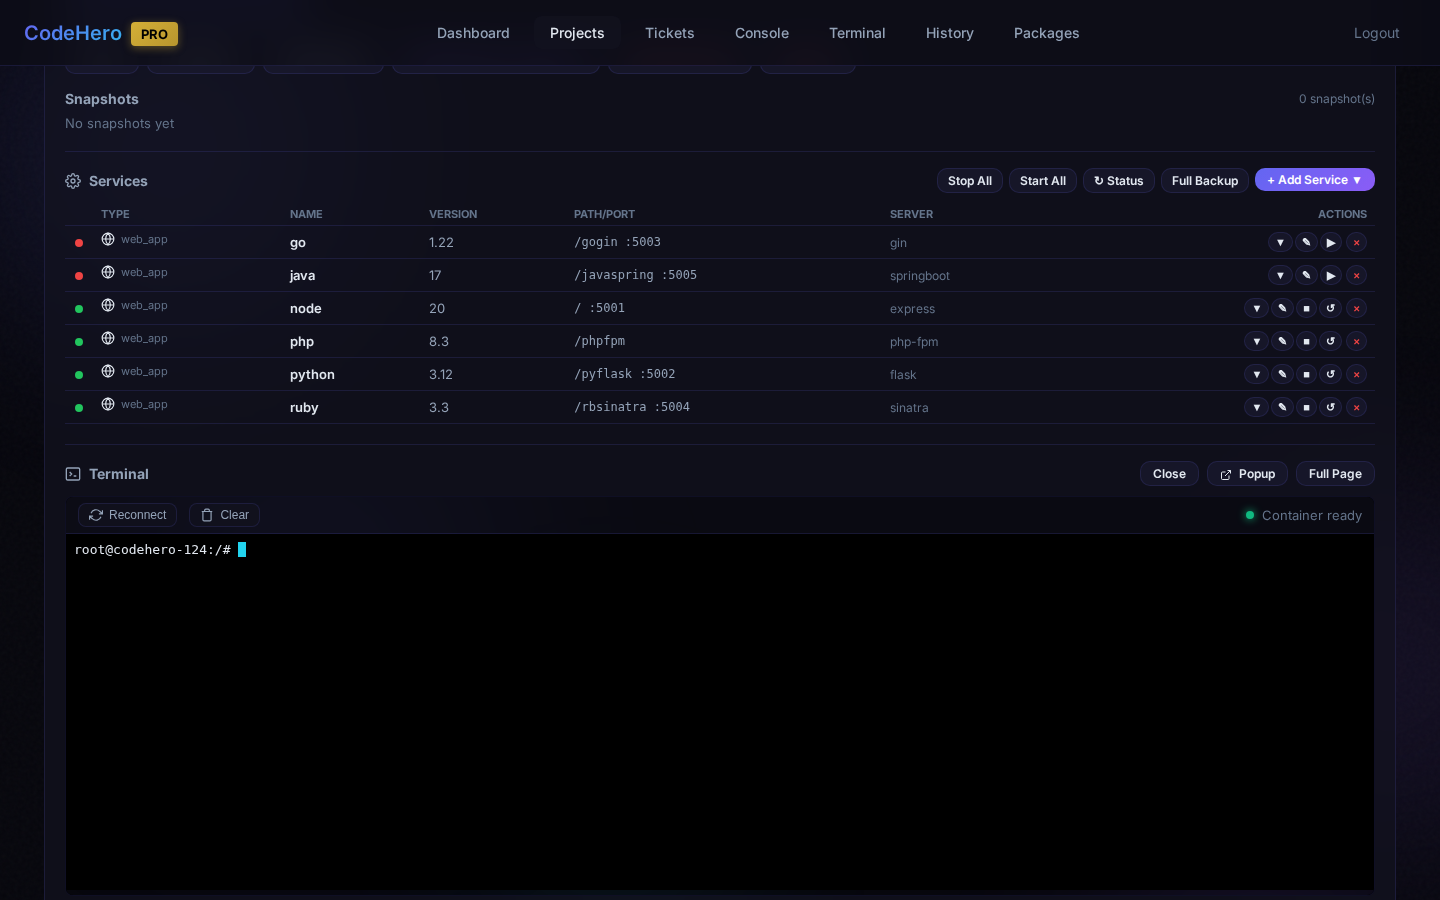
Container Services
The Service Manager (v4.6.3+) lets you install, control, and manage services inside the container without touching the command line.
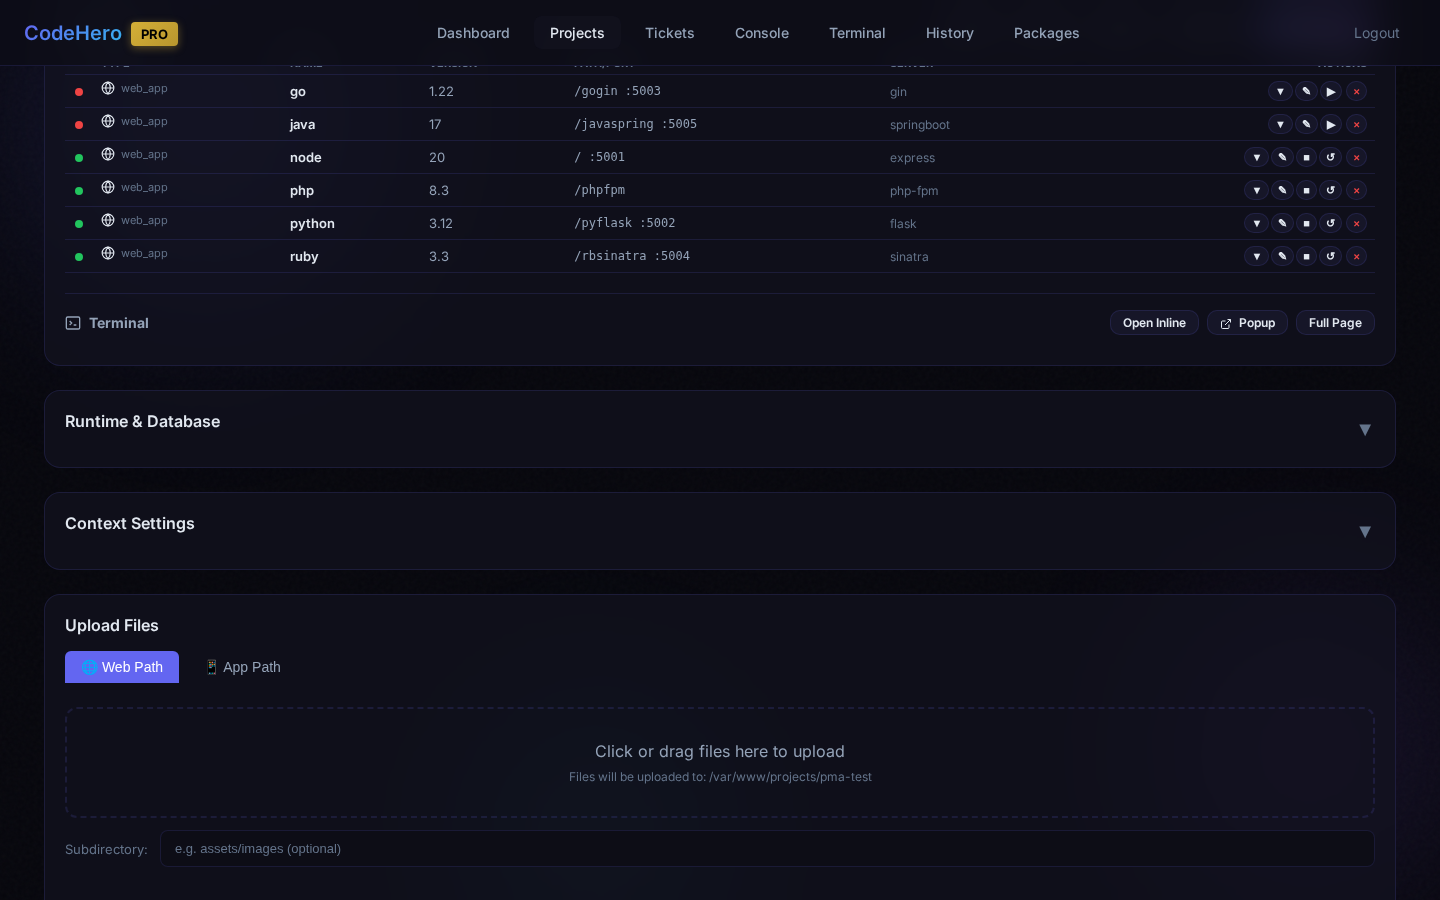
Installing Web Apps
- Click "+ Add Service" → Web App
- Select Language, Version, Server/Framework, and Path
- Click Install
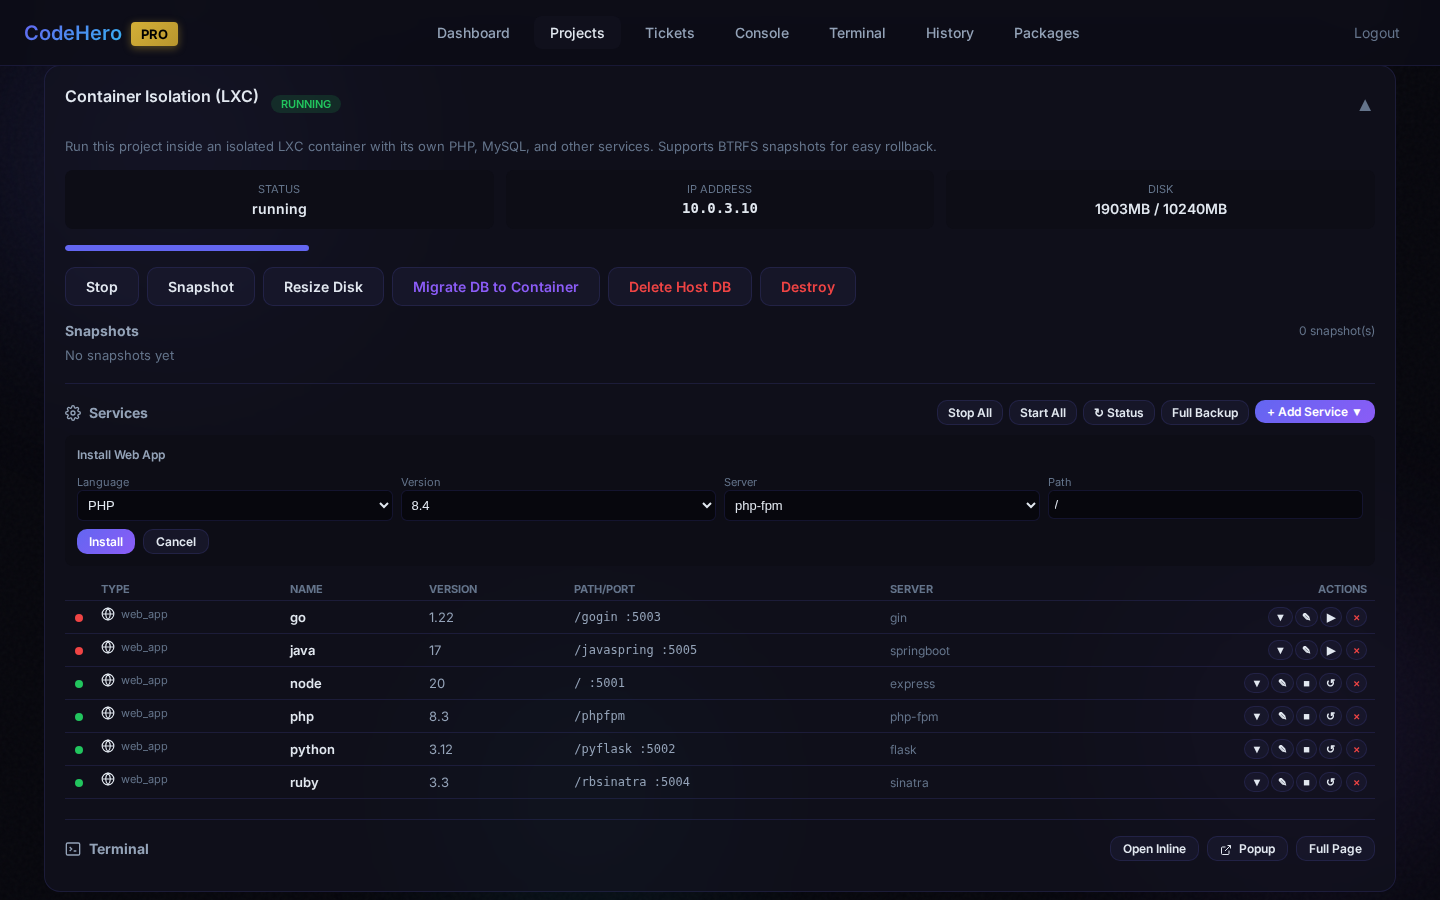
Supported Languages & Frameworks
| Language | Versions | Frameworks |
|---|---|---|
| PHP | 7.4 – 8.4 | php-fpm, Laravel, Symfony, WordPress |
| Python | 3.8 – 3.13 | Flask, Django, FastAPI, Gunicorn, uWSGI |
| Node.js | 18, 20, 22 | Express, NestJS, Next.js, PM2 |
| Go | 1.21 – 1.23 | Gin, Echo, Fiber |
| Ruby | 3.2 – 3.4 | Puma, Rails, Sinatra |
| Java | 8, 11, 17, 21 | Spring Boot, Tomcat |
| .NET | 6.0 – 10.0 | Kestrel |
Installing Databases & Caches
- Click "+ Add Service" → Database
- Select Database type and Version
- Click Install
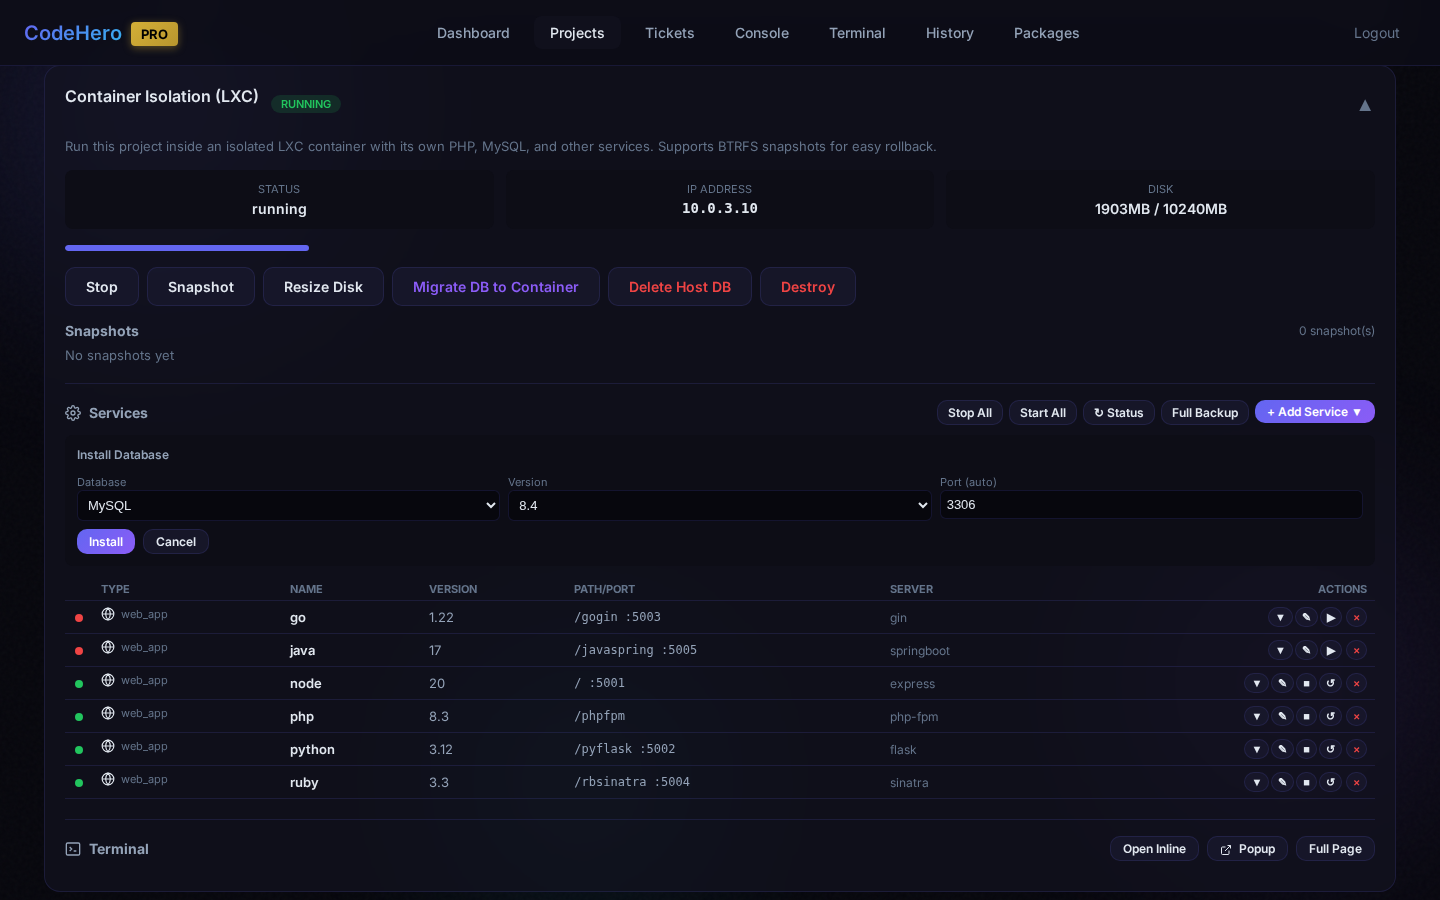
Supported Databases
| Database | Versions | Port | Management Tool |
|---|---|---|---|
| MySQL | 5.7, 8.0, 8.4 | 3306 | phpMyAdmin |
| MariaDB | 10.11, 11.4 | 3306 | phpMyAdmin |
| PostgreSQL | 14 – 17 | 5432 | pgAdmin |
| MongoDB | 8.0 | 27017 | Mongo Express |
| MSSQL | 2022, 2025 | 1433 | — |
Caches
| Cache | Version | Port | Persistence |
|---|---|---|---|
| Redis | 7 | 6379 | RDB snapshots |
| Memcached | 1.6 | 11211 | None (memory only) |
Service Control
Each service has action buttons: Start, Stop, Restart, Delete. Bulk actions at the top: Stop All, Start All, Refresh Status, Full Backup.
Database Backup & Restore
Database services support Backup (timestamped native format), Restore (from backup file), and Full Backup (all databases at once). Backups can be downloaded from the web interface.
Password Management
Database credentials are auto-generated during installation. Change passwords anytime — connection scripts and backup scripts are automatically updated.
Container Terminal
Full shell access inside the container with three modes: Inline (embedded), Popup (new window), Full Page (full-screen). Uses xterm.js with copy/paste support.
When to Use Containers
| Scenario | Recommendation |
|---|---|
| Simple static websites | Container not needed |
| Projects needing specific runtime versions | Use containers |
| Projects requiring databases | Use containers |
| Client projects needing isolation | Use containers |
| Multi-service architectures | Use containers |
32. Production Deployment
Deploy CodeHero behind a production-ready setup with custom domains and SSL.
Nginx Reverse Proxy
Set up Nginx on your server to proxy to CodeHero:
server {
    listen 80;
    server_name codehero.yourdomain.com;
    return 301 https://$host$request_uri;
}

server {
    listen 443 ssl;
    server_name codehero.yourdomain.com;

    ssl_certificate /etc/letsencrypt/live/codehero.yourdomain.com/fullchain.pem;
    ssl_certificate_key /etc/letsencrypt/live/codehero.yourdomain.com/privkey.pem;

    location / {
        proxy_pass https://127.0.0.1:9453;
        proxy_set_header Host $host;
        proxy_set_header X-Real-IP $remote_addr;
        proxy_set_header X-Forwarded-For $proxy_add_x_forwarded_for;
        proxy_set_header X-Forwarded-Proto $scheme;
    }

    # WebSocket support (for console, terminal)
    location /socket.io/ {
        proxy_pass https://127.0.0.1:9453/socket.io/;
        proxy_http_version 1.1;
        proxy_set_header Upgrade $http_upgrade;
        proxy_set_header Connection "upgrade";
        proxy_set_header Host $host;
    }
}
Domain Setup
- Point your domain's DNS A record to your server IP
- Configure the domain in Settings → Domains tab
- The system will automatically configure Nginx
SSL Certificates
Let's Encrypt (Recommended):
- Go to Settings → Certificates
- Enter your domain name
- Click "Request Certificate"
- Certificates auto-renew every 90 days
Custom Certificate:
- Go to Settings → Certificates
- Select "Upload Custom"
- Provide your certificate (.pem) and private key
Firewall Rules
sudo ufw allow 80/tcp    # HTTP (redirect to HTTPS)
sudo ufw allow 443/tcp   # HTTPS
sudo ufw allow 9453/tcp  # CodeHero Dashboard
sudo ufw allow 9867/tcp  # Web Project Previews
33. AI Planning Guide (plan with an external AI)
CodeHero ships a portable planning guide you can paste into any AI chat (Claude, ChatGPT, …). Give the assistant that guide together with a description of the app you want, and it returns a ready‑to‑build CodeHero plan — tickets with the right phases, parallelism, providers, roles, and verification — which you then create here (or hand to the in‑app AI Assistant).
- Click Copy planning guide below.
- Paste it into a new AI chat.
- Describe your project; the assistant produces the CodeHero build plan.
- Bring that plan back here to create the project and its tickets.
The guide is self‑contained — no code or file uploads are needed; CodeHero's agents build everything from the ticket descriptions.
34. Tips & Best Practices
Writing Good Tickets
Do:
- Be specific about what you want
- Include file paths when relevant
- Mention the programming language/framework
- Break large tasks into sub-tickets
Don't:
- Give vague instructions like "make it better"
- Put multiple unrelated tasks in one ticket
- Assume AI knows context from other tickets
Good example:
Title: Add user authentication API

Description:
Create REST API endpoints in /api/auth/:
- POST /api/auth/login - Accept email/password, return JWT
- POST /api/auth/register - Create new user
- GET /api/auth/me - Return current user (requires auth)

Use the existing User model in models/user.py.
Use bcrypt for password hashing.
Bad example:
Title: Auth
Description: Add login
Parallel Execution
- Assign same
sequence_orderto independent tasks - Use different providers for parallel tickets to avoid rate limits
- Ensure parallel tickets work on different files to avoid conflicts
- Maximum 5 parallel tickets per project
Cost Optimization
- Use
junior_developerfor docs, simple configs, boilerplate - Use
senior_developerfor most features - Reserve
master_developerfor architecture and critical code - DeepSeek is cheapest for backend-only work
- Gemini offers good value for general tasks
35. Troubleshooting
Ticket Stuck in "in_progress"
- Check Console for errors
- Use Kill Switch (Stop button or
/stop) - Retry the ticket
AI Not Processing Tickets
- Check daemon:
systemctl status codehero-daemon - Review logs:
journalctl -u codehero-daemon -f - Verify MySQL:
systemctl status mysql - Restart:
sudo systemctl restart codehero-web codehero-daemon
Permission Errors
- Ensure
claudeuser has read/write access - Check ownership:
ls -la /path/to/project - Fix:
chown -R claude:claude /path/to/project
Can't Access Dashboard
- Check services:
systemctl status codehero-web nginx - Check firewall:
sudo ufw allow 9453 - Verify IP:
hostname -I - Browser may block self-signed cert
Provider API Errors
- Verify API key in Settings
- Check provider status page
- Try a different provider temporarily
- Reduce parallel tickets if rate limited
36. Keyboard Shortcuts
Code Editor
| Shortcut | Action |
|---|---|
Ctrl+S | Save file |
Ctrl+Z | Undo |
Ctrl+Shift+Z | Redo |
Ctrl+F | Find |
Ctrl+H | Find and Replace |
Ctrl+G | Go to line |
Ctrl+D | Select next occurrence |
Ctrl+/ | Toggle comment |
Alt+Up/Down | Move line up/down |
Ctrl+Shift+K | Delete line |
Ctrl+Click | Go to definition |
Web Terminal
| Shortcut | Action |
|---|---|
Ctrl+C | Interrupt command |
Ctrl+D | Exit shell |
Ctrl+L | Clear terminal |
Ctrl+Shift+C | Copy selection |
Ctrl+Shift+V | Paste |
General
| Shortcut | Action |
|---|---|
Escape | Close modal |